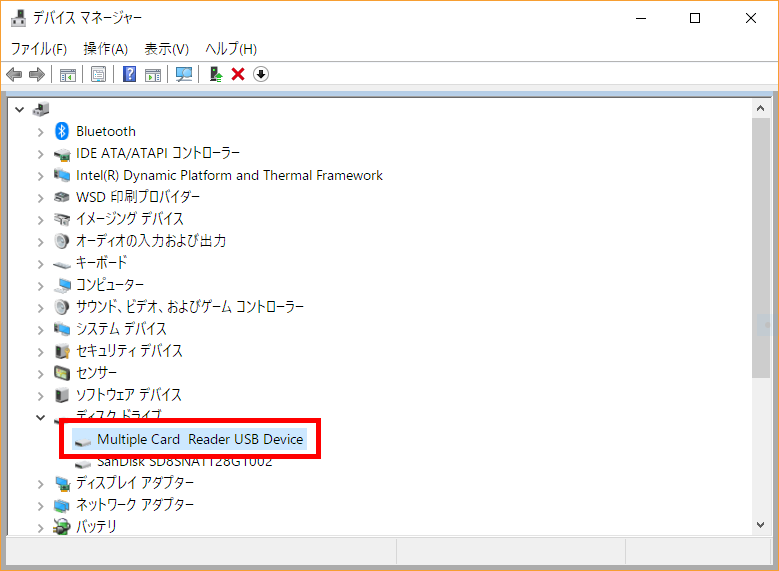
This article covers how to convert a microSD card into a local disk on Windows 10 64-bit.
“Making microSD memory appear as a local disk” was a hot topic during the netbook era and the peak of Windows tablets. Even today, many Surface Pro 128GB owners run out of storage, and those using low-cost devices with eMMC storage that cannot easily be upgraded often supplement their storage with a microSD card, so I decided to update this guide.
I am one of those people. I use an ASUS TransBook T304UA, a detachable 2-in-1 PC (basically a Sur○ace knockoff) with a kickstand, and unfortunately I went with the 128GB model, so I ran out of space and had no choice but to offload data onto a microSD card.
You might think offloading data is good enough, but since a microSD is classified as a “removable” media device that can be easily removed from the computer, there are quite a few restrictions — for example, many applications refuse to install to a removable drive.
That is why making a “removable” device appear as a “local disk” became a popular trick for a while.
However, since many existing methods did not support the now-mainstream 64-bit architecture, this article explains how to make it work on 64-bit systems.
The method covered here is “making microSD memory appear as a local disk.”
Symbolic links and virtual VHDs serve a different purpose, so they are not covered here.
What You Need
– Hitachi Micro Drive Filter Driver 64-bit version (modified) (Mirror)
– Windows 10 SDK
– A text editor (Notepad will work)
Before You Start
Disable Secure Boot and BitLocker.
*The modified driver has been scanned with VirusTotal and confirmed to be free of malware. However, when downloading from Uploaded.net, malicious ads may cause files like “cfadisk-x64-1.zip.exe” (malware) to download. If you are concerned, use the OneDrive mirror link instead — it is the safer option.
cfadisk-x64-1.zip → VirusTotal Results
cfadisk.inf → VirusTotal Results
cfadisk.sys → VirusTotal Results
Verified Environment
– ASUS TransBook T304UA (Windows 10 Build 1803 64-bit)
Estimated Time
15 minutes to 1 hour
Overall Procedure
I. Preparing the driver
II. Self-signing the driver
III. Disabling driver signature enforcement
IV. Installing the driver
I. Preparing the Driver
① Extract the downloaded file. After extraction, you will see a file structure like the one shown. Open “cfadisk.inf” with a text editor.
② Delete unnecessary entries to match your environment.
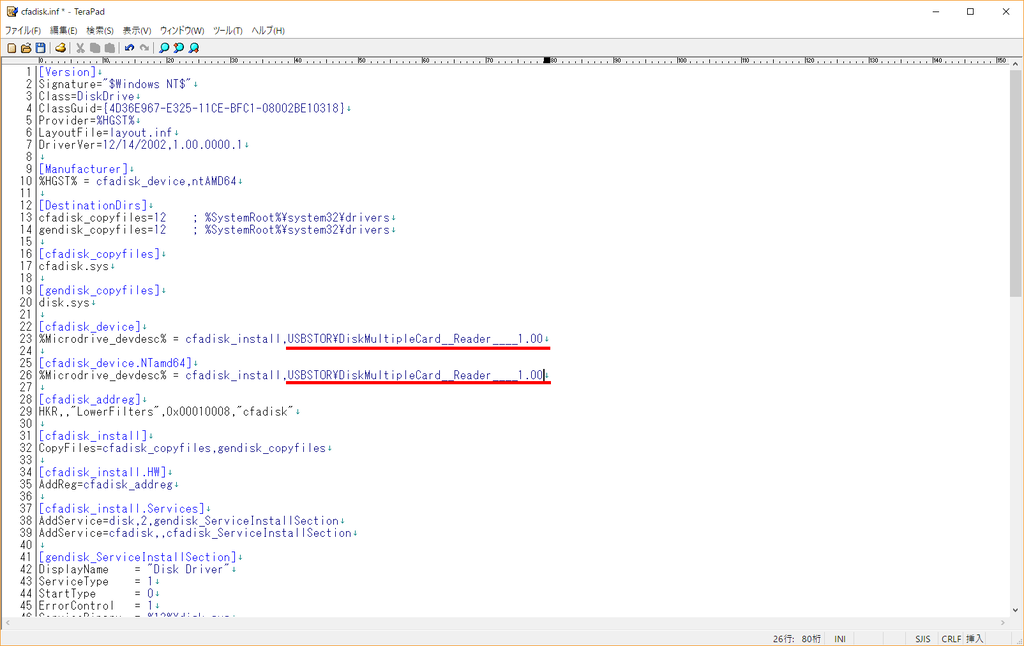
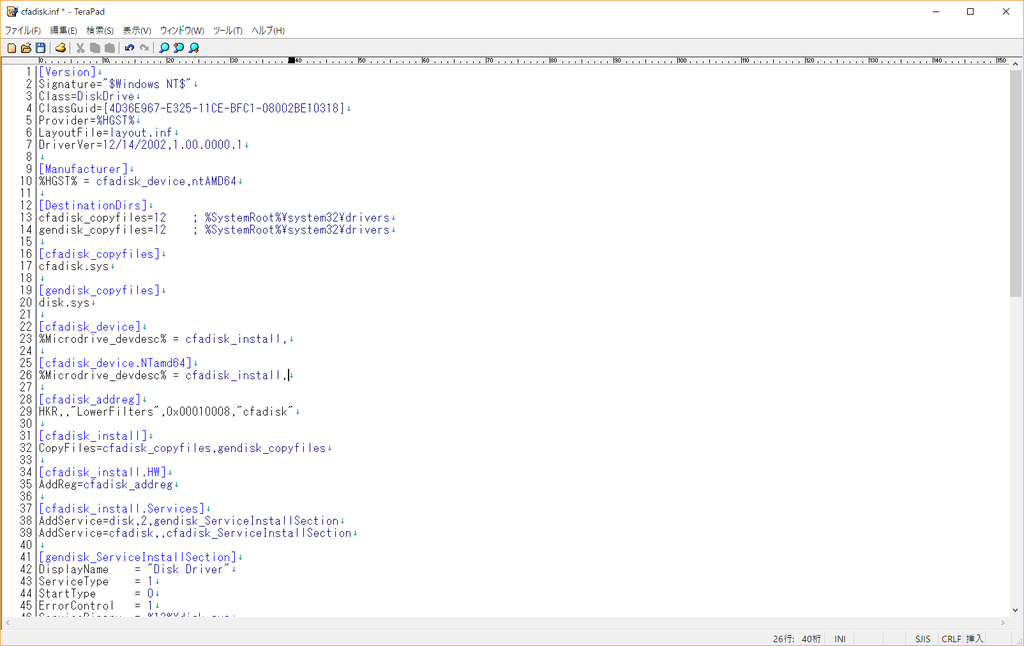
Delete the two lines containing “IDE\DiskTS64GCF400______________________________20101008” (marked in red in the images).
↓ Before deletion
↓ After deletion
③ Open Device Manager and double-click on the microSD card reader or USB memory device you want to convert to a local disk. The Properties dialog will appear. Go to the “Details” tab and copy the topmost entry under “Hardware IDs.”
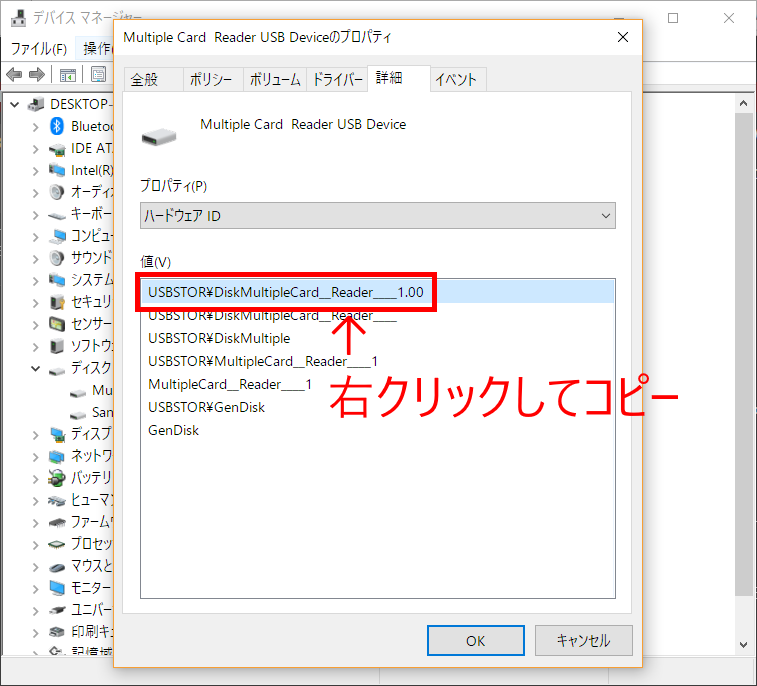
④ Paste the copied Hardware ID into the locations where you deleted the previous entries.
In my case, the Hardware ID was “USBSTOR\Disk&Ven_Multiple&Prod_Card__Reader&Rev_1.00”, so the entries look like:
[cfadisk_device]
%Microdrive_devdesc% = cfadisk_install,USBSTOR\Disk&Ven_Multiple&Prod_Card__Reader&Rev_1.00
[cfadisk_device.NTamd64]
%Microdrive_devdesc% = cfadisk_install,USBSTOR\Disk&Ven_Multiple&Prod_Card__Reader&Rev_1.00
(The red text is what was pasted.)
Once pasted, the driver preparation is complete. Let us move on to the next step.
II. Self-Signing the Driver
Starting with Windows 8, a “digital signature” is required for drivers. The rationale is to prevent malicious drivers from being installed, but it does make things a bit inconvenient…
While you can select “Disable driver signature enforcement” from the Windows startup settings, completely unsigned drivers can no longer be installed at all under the current system.
Therefore, you need to “self-sign” the driver — essentially issuing your own digital signature to make it installable.
Here is how to self-sign the driver:
① Install the Windows 10 SDK mentioned in the “What You Need” section.
We only need certain files created after installation, so you can proceed through the installer by clicking “Next” without changing anything.
② Create a working folder on the root of the C: drive.
Any name will do. I created a folder called “sign.”
Since command-line operations come next, if you create the same folder name as mine, you can simply copy-paste the commands below.
③ After installation, navigate to the install directory.
It should typically be located inside “C:\Program Files (x86)\Windows Kits\10\bin”, but the exact path varies depending on the Windows 10 SDK version, so it may be easier to navigate to the Windows Kits folder and use the search function.
Note: if you use the search function, three results will likely appear, sorted into “amd/x86/x64” folders. Be sure to use the files from the “x64” folder.
④ Copy “certmgr.exe”, “makecert.exe”, and “signtool.exe” from the SDK directory and paste them into the working folder (the “sign” folder).
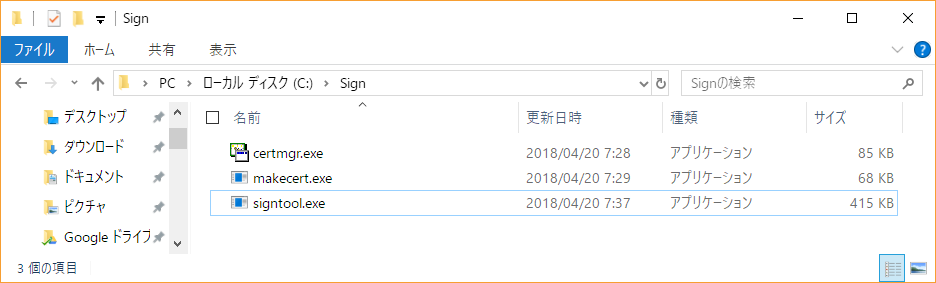
⑤ Open a Command Prompt with administrator privileges.
Once open, enter:
bcdedit /set TESTSIGNING ON
If you see “The operation completed successfully,” you are good to go.
Note: Secure Boot must be disabled beforehand, or this command will fail.
⑥ Change to the working directory.
Navigate to the working folder using:
cd C:\Sign
⑦ Next, create a “self-signed certificate.”
makecert -pe -r -ss my -n "CN=Sign" Sign.cer
If “Succeeded” is displayed, the certificate was created successfully.
If you check the working folder, you will see that a file called “Sign.cer” has been created.
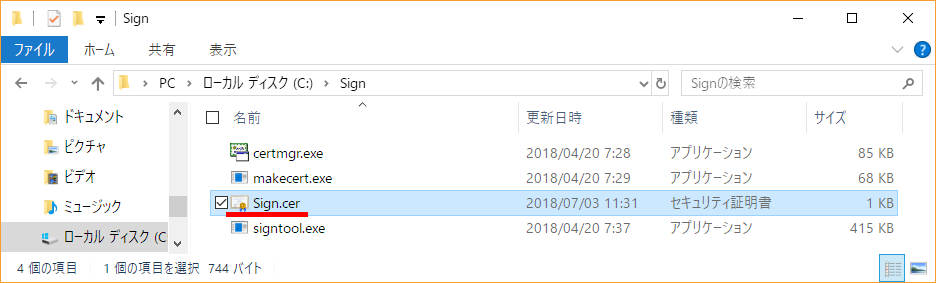
⑧ Next, install the self-signed certificate you just created onto your PC.
Note: The self-signed certificate is only valid on the PC where it was issued.
certmgr.exe -add Sign.cer -s -r localMachine root
If “CertMgr Succeeded” is displayed, follow up with:
certmgr.exe -add Sign.cer -s -r localMachine trustedpublisher
If “CertMgr Succeeded” is displayed again, you are done with this step.
⑨ Finally, apply the self-signed certificate to the driver you prepared in Step I.
Copy “cfadisk.sys” into the working folder and run the following command:
signtool.exe sign -a -v -s my -n Sign cfadisk.sys
If the output includes “Number of files successfully Signed: 1,” the signing was successful. Copy the signed “cfadisk.sys” back to the original driver folder, overwriting the old file.
Note: If you have self-signed drivers before, run:
signtool.exe sign -a -v -s my -n Sign cfadisk.sys
This is the same command. If the output includes “Number of files successfully Signed: 1,” you are good to go.
*A full command execution example is provided at the end of this article for reference.
III. Disabling Driver Signature Enforcement
Most people are probably already familiar with this step. In Windows 10, go to “Settings → Update & Security → Recovery” and click “Restart now” under “Advanced startup.”
An options screen will appear. Navigate to “Troubleshoot → Advanced options → Startup Settings.”
Click “Startup Settings” and then “Restart.”
When the startup options appear after restarting, press “7 or F7” on your keyboard.
This will boot Windows with driver signature enforcement disabled.
IV. Installing the Driver
This is the final step.
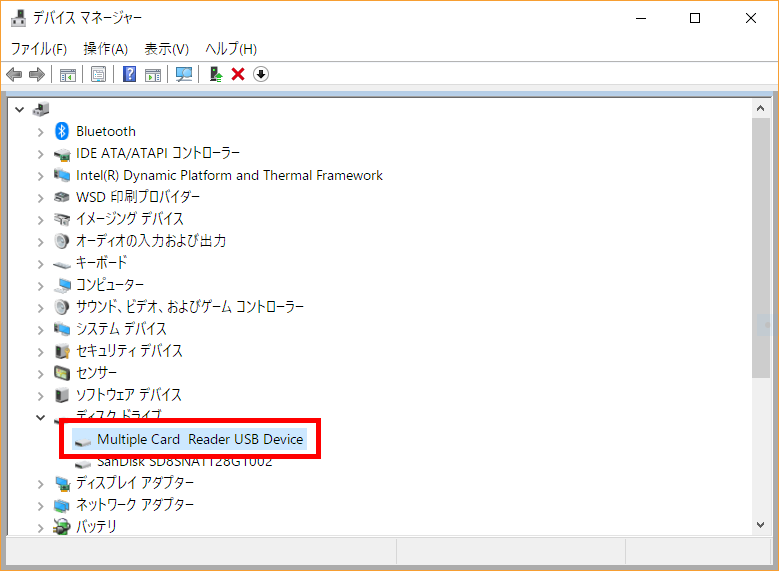
① Once Windows has booted with driver signature enforcement disabled, open Device Manager.
② Right-click the device you want to convert to a local disk and select “Update driver.”
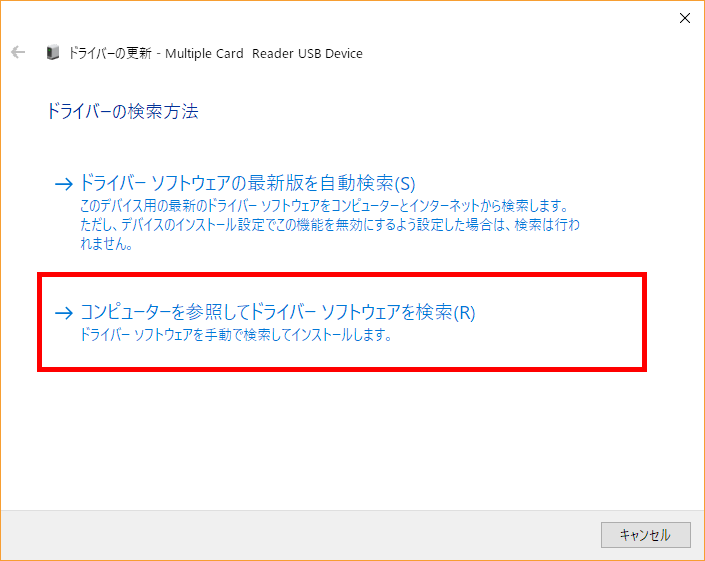
③ Click “Browse my computer for drivers.”
④ Click “Let me pick from a list of available drivers on my computer.”
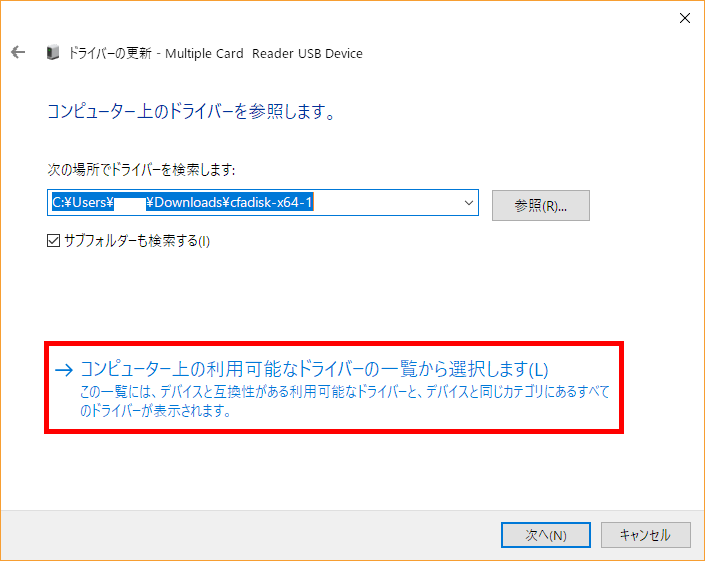
⑤ Click “Have Disk.”
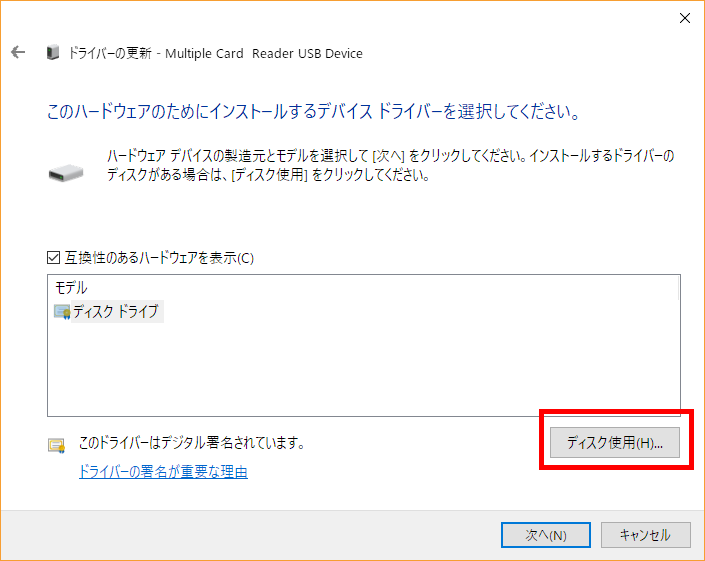
⑥ Click “Browse,” navigate to the folder containing your prepared driver, and select “cfadisk.inf.”
⑦ A warning will appear. Select “Yes.”
⑧ Another warning will appear. Click “Install this driver software anyway.”
⑨ If the installation completes successfully, you are done. Restart your computer normally, and if the microSD card is recognized as a local disk, the procedure was successful.
That covers the entire process. Below is a full command execution example for reference.
Command Examples
Microsoft Windows [Version 10.0.17134.112]
(c) 2018 Microsoft Corporation. All rights reserved.
C:\Windows\system32>bcdedit /set TESTSIGNING ON
The operation completed successfully.
C:\Windows\system32>cd C:\Sign
C:\Sign>makecert -pe -r -ss my -n "CN=Sign" Sign.cer
Succeeded
C:\Sign>certmgr.exe -add Sign.cer -s -r localMachine root
CertMgr Succeeded
C:\Sign>certmgr.exe -add Sign.cer -s -r localMachine trustedpublisher
CertMgr Succeeded
C:\Sign>signtool.exe sign -a -v -s my -n Sign cfadisk.sys
The following certificate was selected:
Issued to: Sign
Issued by: Sign
Expires: Sun Jan 01 08:59:59 2040
SHA1 hash: E36451F9C2ACB56E6549040792350757295D3AB1
Done Adding Additional Store
Successfully signed: cfadisk.sys
Number of files successfully Signed: 1
Number of warnings: 0
Number of errors: 0
C:\Sign>
If You Have Self-Signed Before
Microsoft Windows [Version 10.0.17134.112]
(c) 2018 Microsoft Corporation. All rights reserved.
C:\Windows\system32>bcdedit /set TESTSIGNING ON
The operation completed successfully.
C:\Windows\system32>cd C:\Sign
C:\Sign>makecert -pe -r -ss my -n "CN=Sign" Sign.cer
Succeeded
C:\Sign>certmgr.exe -add Sign.cer -s -r localMachine root
CertMgr Succeeded
C:\Sign>certmgr.exe -add Sign.cer -s -r localMachine trustedpublisher
CertMgr Succeeded
C:\Sign>signtool.exe sign -a -v -s my -n Sign cfadisk.sys
The following certificates have been found to be suitable for signing:
Issued to: Test Sign
Issued by: Test Sign
Expires: Sun Jan 01 08:59:59 2040
SHA1 hash: E36451F9C2ACB56E6549040792350757295D3AB1
Issued to: Sign
Issued by: Sign
Expires: Sun Jan 01 08:59:59 2040
SHA1 hash: C31C14B7884B4D9FB8674E89DF01981EAAD6BB5D
Issued to: Test Sign
Issued by: Test Sign
Expires: Sun Jan 01 08:59:59 2040
SHA1 hash: A04D186504CC6C1006B38C9D0B224A3C1A714F78
Issued to: Sign
Issued by: Sign
Expires: Sun Jan 01 08:59:59 2040
SHA1 hash: 65912F8CCD629C0B1EAC74667642032A24FE79D4
Issued to: Test Sign
Issued by: Test Sign
Expires: Sun Jan 01 08:59:59 2040
SHA1 hash: 62F49AED30BD421C411B7E8B85A6A13AB7CCBEC0
The following certificate was selected:
Issued to: Sign
Issued by: Sign
Expires: Sun Jan 01 08:59:59 2040
SHA1 hash: 65912F8CCD629C0B1EAC74667642032A24FE79D4
Done Adding Additional Store
Successfully signed: cfadisk.sys
Number of files successfully Signed: 1
Number of warnings: 0
Number of errors: 0
C:\Sign>
Recommended Items
High-Speed MicroSDXC Card (SanDisk / Samsung)
Choose a reliable, high-speed microSD card for local disk conversion.
![[Installation Guide] Running Windows 10 on ARM on a Lumia 950 XL](https://miyagadget.page/wp-content/uploads/2023/08/SC5OSG1l.jpg)

Leave a Reply