This time, let me share my experience with rental cycles (bike sharing).
You’ve probably noticed the red electric bicycles rapidly increasing in number across Tokyo lately.
These red bikes are all electric bicycles from the “Bike Sharing” program, operated as a pilot project across various Tokyo wards in partnership with NTT Docomo.
I decided to try renting one of these red bikes myself.
Pricing
One-time member: Base fee 0 yen / First 30 min: 150 yen / Every 30 min thereafter: 150 yen
Day pass: Base fee 1,500 yen per day (additional 500 yen if an IC card is issued)
Monthly member: Base fee 2,000 yen per month / First 30 min: 0 yen / Every 30 min thereafter: 100 yen
How to Rent a Bike
One-time member / Monthly member
Register online in advance
↓
Bike rental
Day pass
Purchase a pass at an unmanned or staffed ticket machine.
↓
Bike rental
That’s the basic flow.
Trying the Pre-Registration
Go to the bike sharing website for the ward you’ll most frequently use and complete the member registration.
For Shinjuku Ward, you can register from the top-left of the bike sharing website.
You can also register through the app instead of using a PC.
Docomo Bike Share Port Navi
iOS (for iPhone): App Store
Android: Google Play
This will take you to the Docomo bike sharing website. Click “Register as Member” and follow the steps.
By the way, if you have a Docomo mobile plan, you can log in with your d Account and have the bike usage fees added to your phone bill. (You can also switch to credit card payment.)
The terms of service will be displayed, so read through them carefully and click “Agree.”
They even have the terms of service available in English, presumably for international tourists. I was a bit surprised by that.
Next, fill in your member information. Make sure to enter everything accurately.
Then you’ll be asked about payment methods. Currently, only “Docomo billing” and “credit card” are available as payment options.
Since my Docomo line is through an MVNO and I personally prefer not to carry a credit card (I’d probably go bankrupt if I had one), I tried paying with various card-branded debit and prepaid cards.
Here are the results:
SMBC Debit Card: Failed
Kyash: Failed
LINE Pay: Failed
Osaifuponta: Failed
au Wallet Card: Failed
Vandle Card: Succeeded
Only the Vandle Card worked. I was honestly surprised.
I had stopped using the Vandle Card after they added a questionable feature (a card-loan-like “Pochitto Charge” function). But it turned out to be useful here, so I still quietly keep the app installed.
Even if you don’t have a credit card like me, you can use Docomo Bike Share by installing the Vandle Card app, which is an online-only prepaid payment solution.
However, please make sure to load enough balance to cover the rental fee before you ride. If Docomo Bike Share can’t charge the fee, they may take action, so please keep that in mind.
((Though that should go without saying…))
Vandle Card App
iOS (for iPhone): App Store
Android: Google Play
For more details, a quick Google search should help.
After that, I believe you can set up your preferred area and port settings.
Once registration is complete, you should see the top screen. That means you’re all set.
Step-by-Step: Renting a Bike
From here, I’ll walk through the process using the smartphone app. The screenshots are from iOS, but Android should be similar.
((Nobody’s going to pull out a laptop in front of a bike port, right…))
Open the Docomo Bike Share Port Navi app you downloaded earlier, and tap the “Rent” tab at the bottom.
You’ll see nearby ports on the map. In central Tokyo, there are quite a few ports available.
White callout bubbles indicate “0 bikes available for rental,” while red callout bubbles mean “bikes are available.”
Tap on a red callout with available bikes.
The port information will appear. Check the “number of available bikes” and “port location.” Once confirmed, head to the port.
If you’re not sure where it is, tap “Go here” to launch a navigation app.
Once you arrive at the port, tap “Log In” in the app and complete the login process.
Next, tap either “Choose from parking lot” or “Choose from bicycle.” I personally recommend choosing from the parking lot.
Select the area and location, then choose the port you’re currently at.
A list of available bikes will appear. Check the bike number written on the back of each red bicycle, and if the battery level looks good, tap that number.
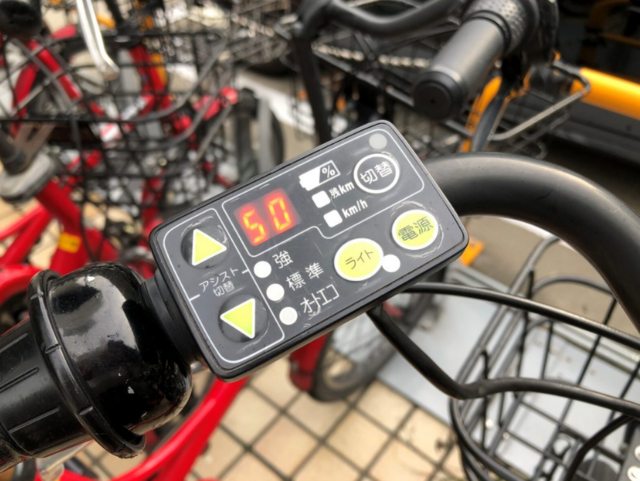
You can check the battery level on the device attached near the handlebars. Press the power button to display it. In this case, there was 50% remaining.
Once you select a bike, a 4-digit passcode will be displayed. Enter it into the device on the back of the bicycle to unlock and rent it.
To return the bike, insert the front wheel into the bike stand at a port, lock it, and follow the instructions on the rear device.
Occasionally, locking alone may not complete the return process. Make sure the rear device displays “Returned” and that you receive a “Return Confirmation” email.
Conclusion
I thought renting a bike would be easier, but it actually requires quite a few cumbersome steps. Apparently, if you have a FeliCa-enabled phone, you can just tap to rent, but the pre-registration process is still a hassle either way.
Also, the app is quite mediocre. The rental section opens an in-app browser, which is essentially the same as using a regular browser — not a great user experience.
On top of that, the one-time member pricing feels quite expensive. If you plan to use it regularly, I’d recommend going with the monthly plan (2,000 yen).
Despite these annoyances and quirks, the service itself is actually very convenient once you start using it. Give it a try if you get the chance!

Leave a Reply