![[Flask + WebAuthn] Building a Mobile-Friendly Household Budget Web App with Passkey Authentication](https://miyagadget.page/wp-content/uploads/2025/11/ChatGPT-Image-2025年11月23日-10_41_02.png)
In this article, I’ll share how I built a Flask-based, mobile-first web accounting application. I also implemented a feature for manually importing American Express credit card statements.
While there are plenty of household budget apps out there, I decided to build my own from scratch to meet these requirements: “I want full control over my data,” “I want quick input from my phone,” and “I want solid security.”
Introduction: Why I Built It Myself
There are plenty of commercial household budget apps available, but I decided to build my own for the following reasons:
- Complete data ownership: I wanted to manage my data entirely on my own server (NAS, etc.) instead of relying on cloud services
- Customizability: I wanted the freedom to add and modify categories and features as needed
- Mobile support: A mobile-first UI for quick input on the go
- Security: I wanted to implement modern WebAuthn (passkey) authentication
- AMEX integration: I wanted to efficiently import credit card statements
Existing tools often couldn’t quite meet my specific needs, so I took the plunge and built my own.
Feature Overview
This web accounting app includes the following features:
Key Features
- Expense entry and display (optimized for smartphones)
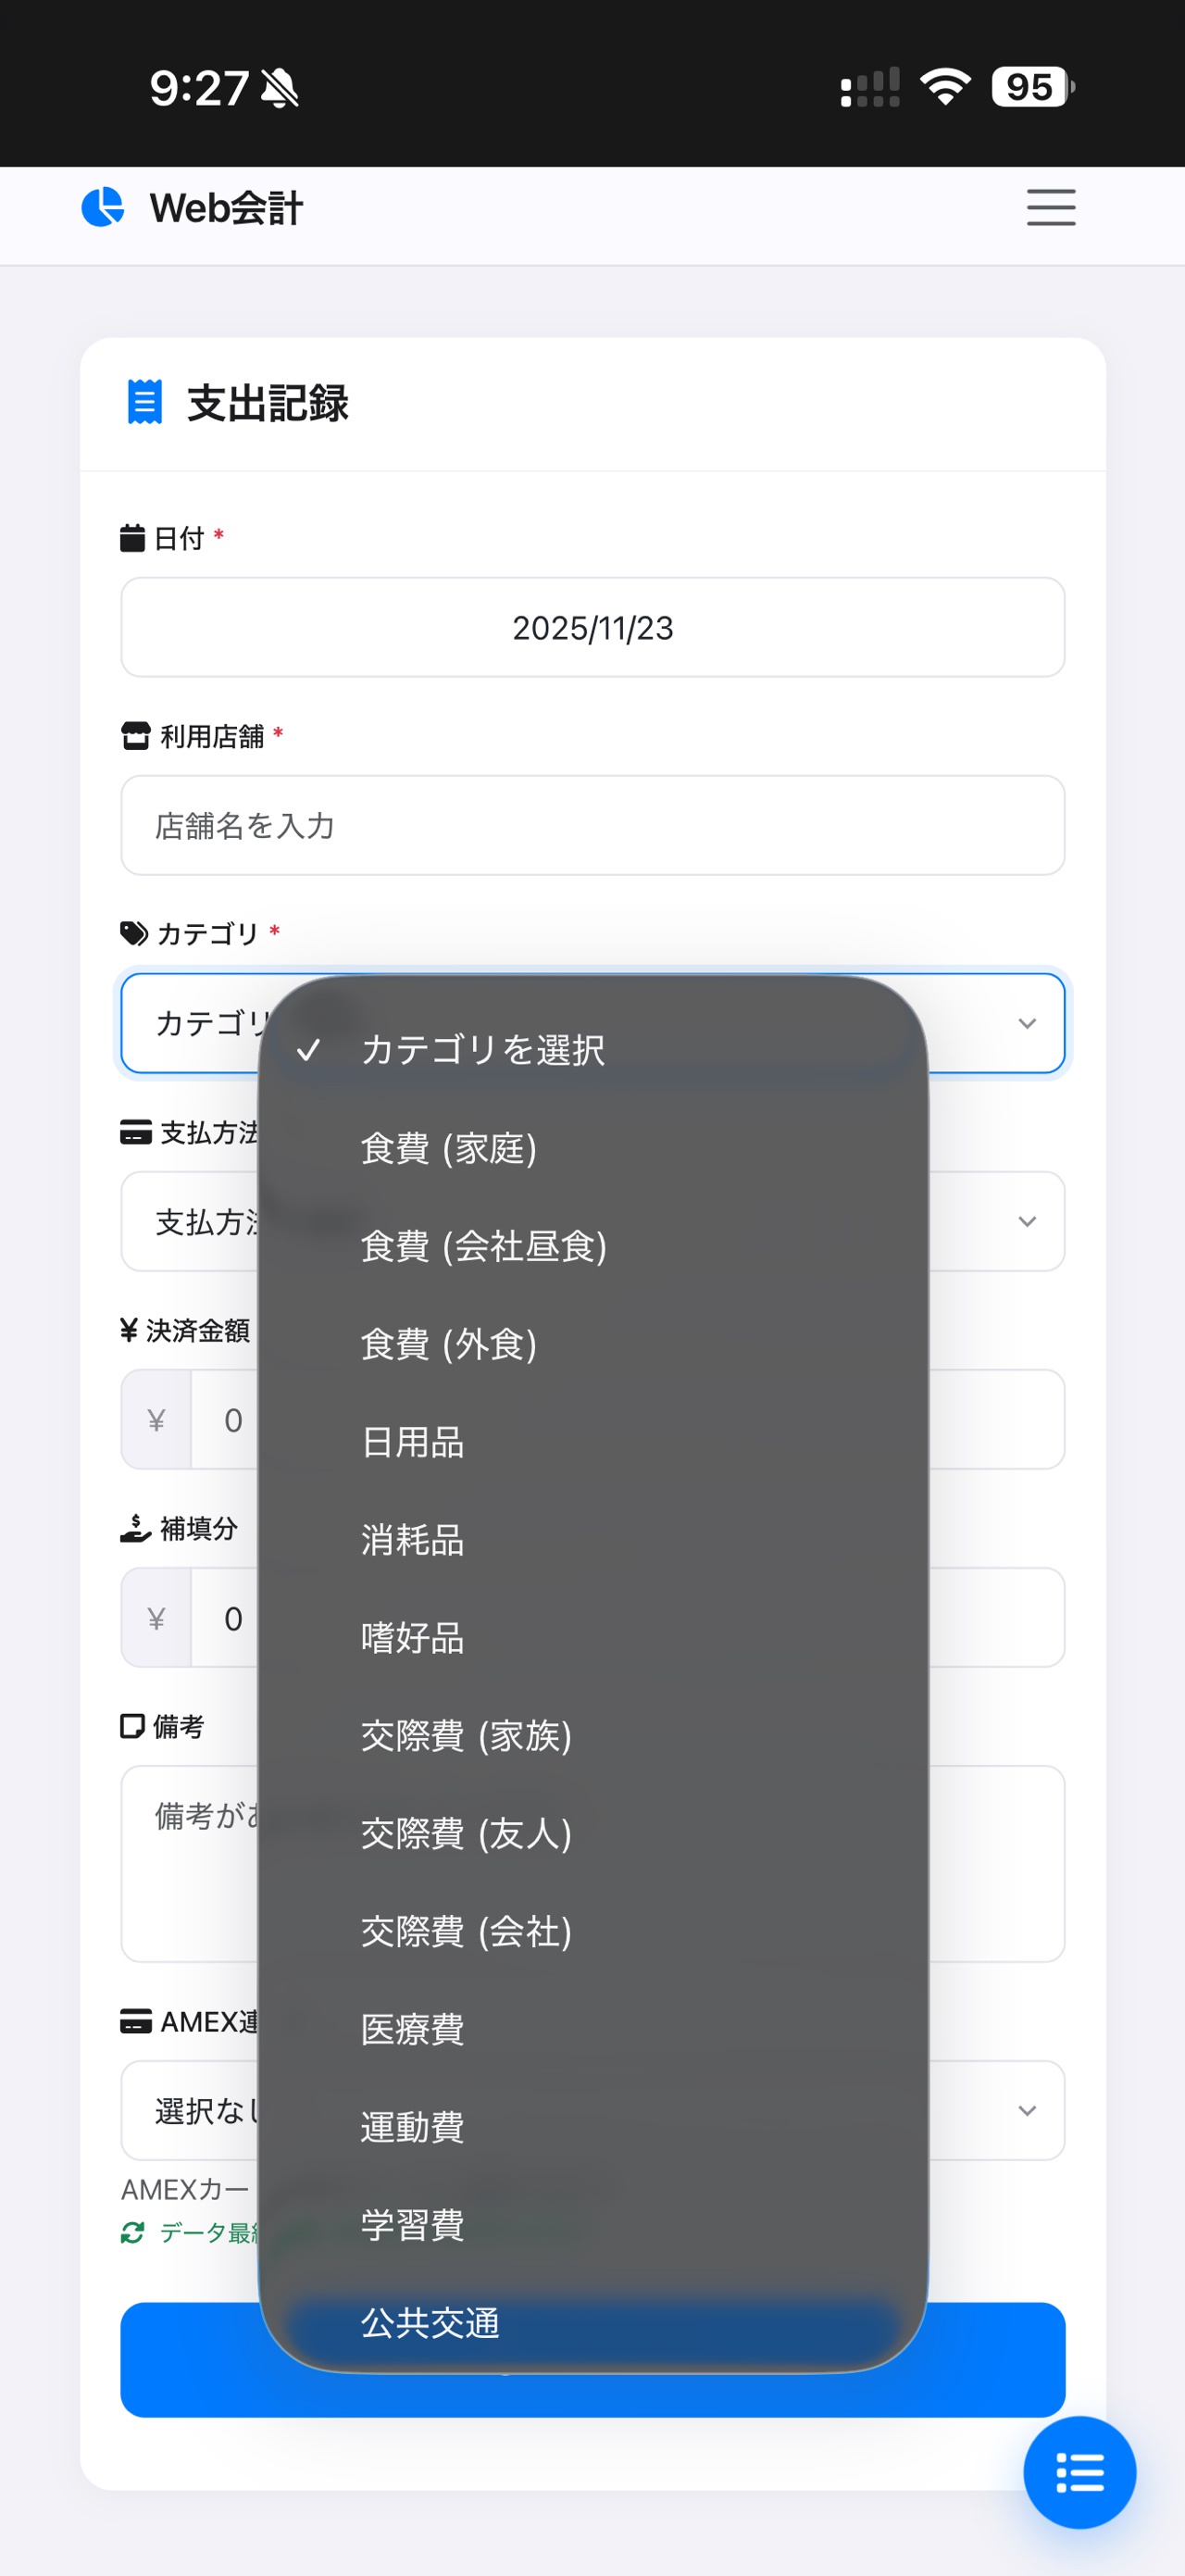
- Category-based expense totals (27 categories including food, daily necessities, medical expenses, etc.)
- Monthly reports
- WebAuthn (passkey) authentication
- Admin features (account management, category management)
- Login attempt limiting and IP BAN system
- Receipt image upload
- Monthly settlement feature
- Utility bill management dashboard
- Manual AMEX data import (via CSV files)
Screen Layout
The main screens are:
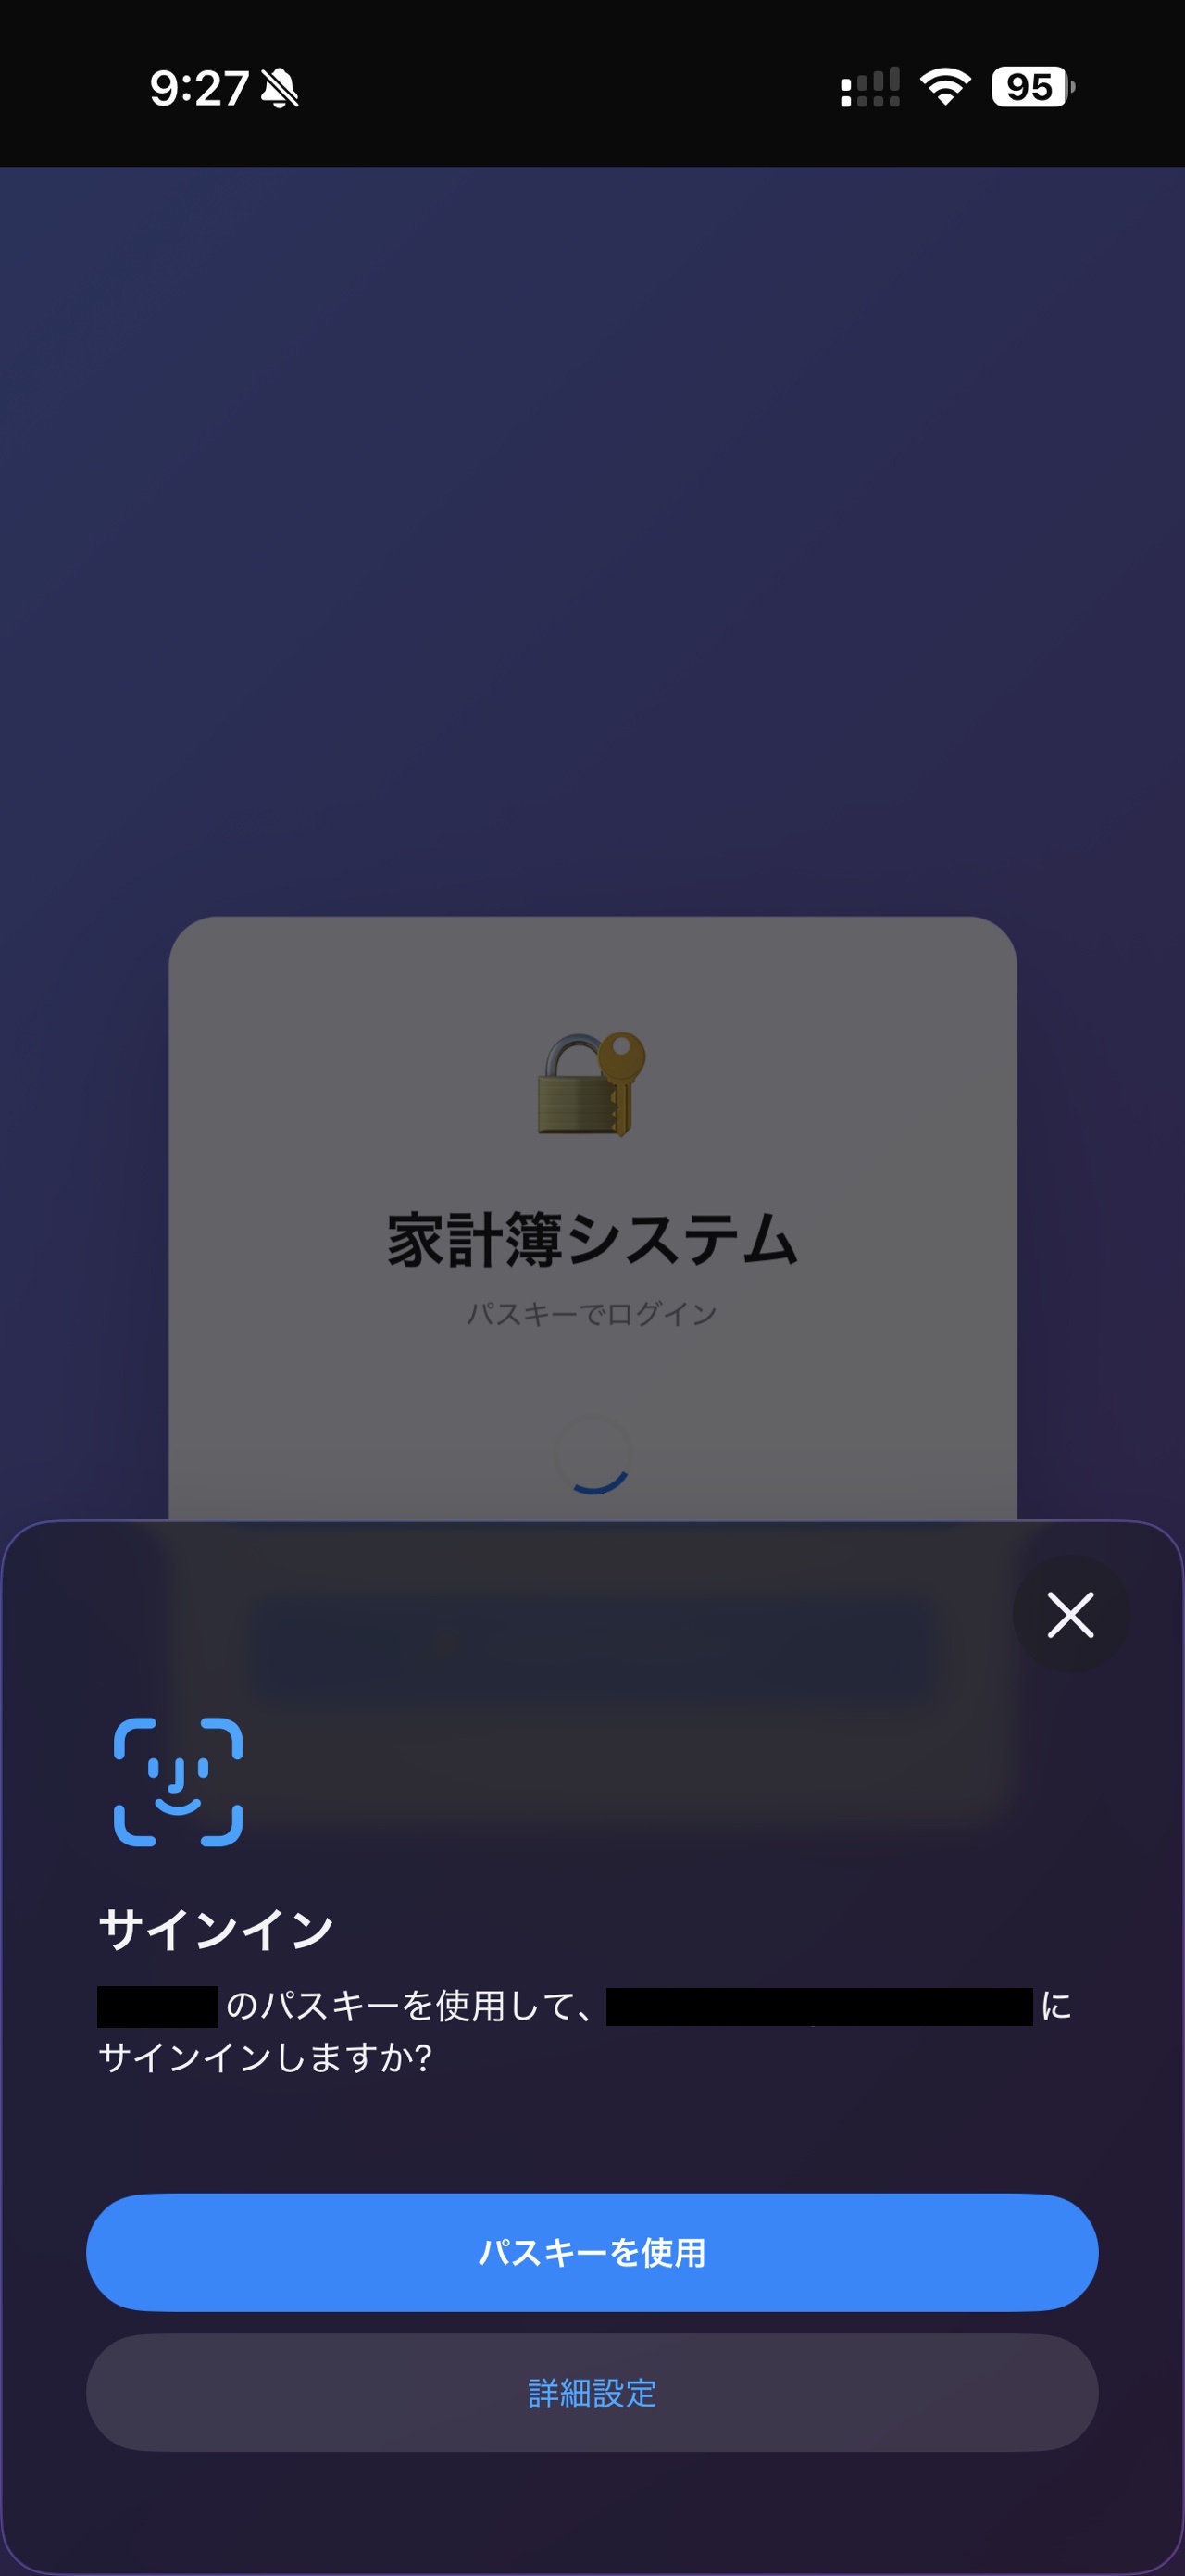
- Login screen: Biometric authentication via WebAuthn (passkey)
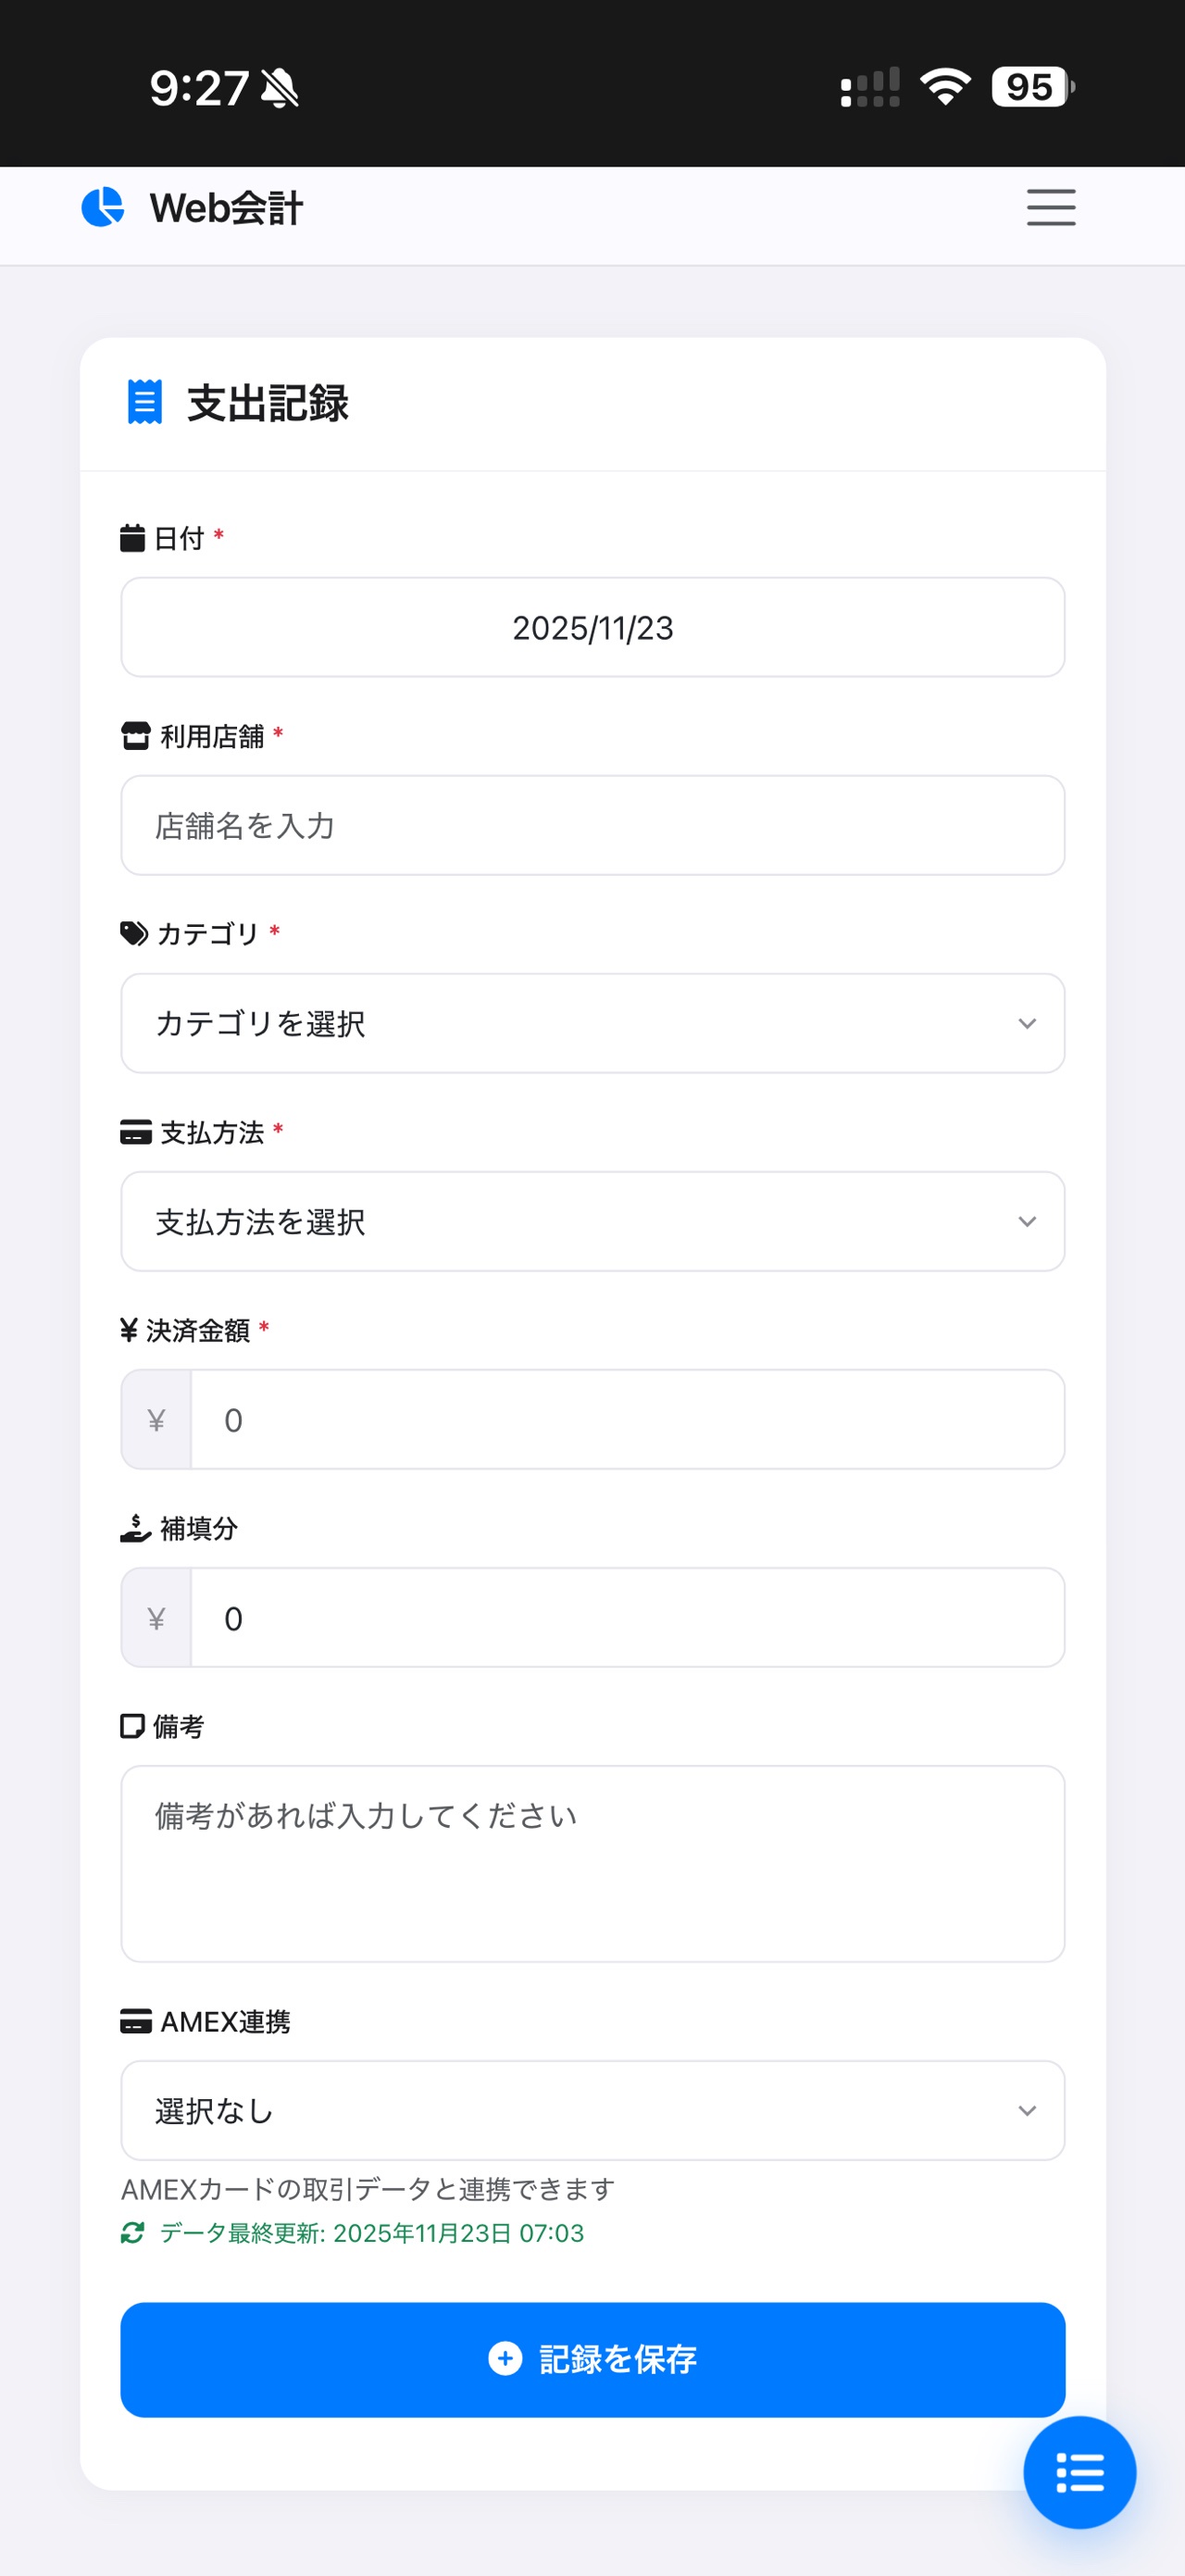
- Expense entry screen: Input date, store, category, amount, etc.
- Records list screen: Monthly expense list with category-based totals
- Admin screen: Category management, account management, BAN management
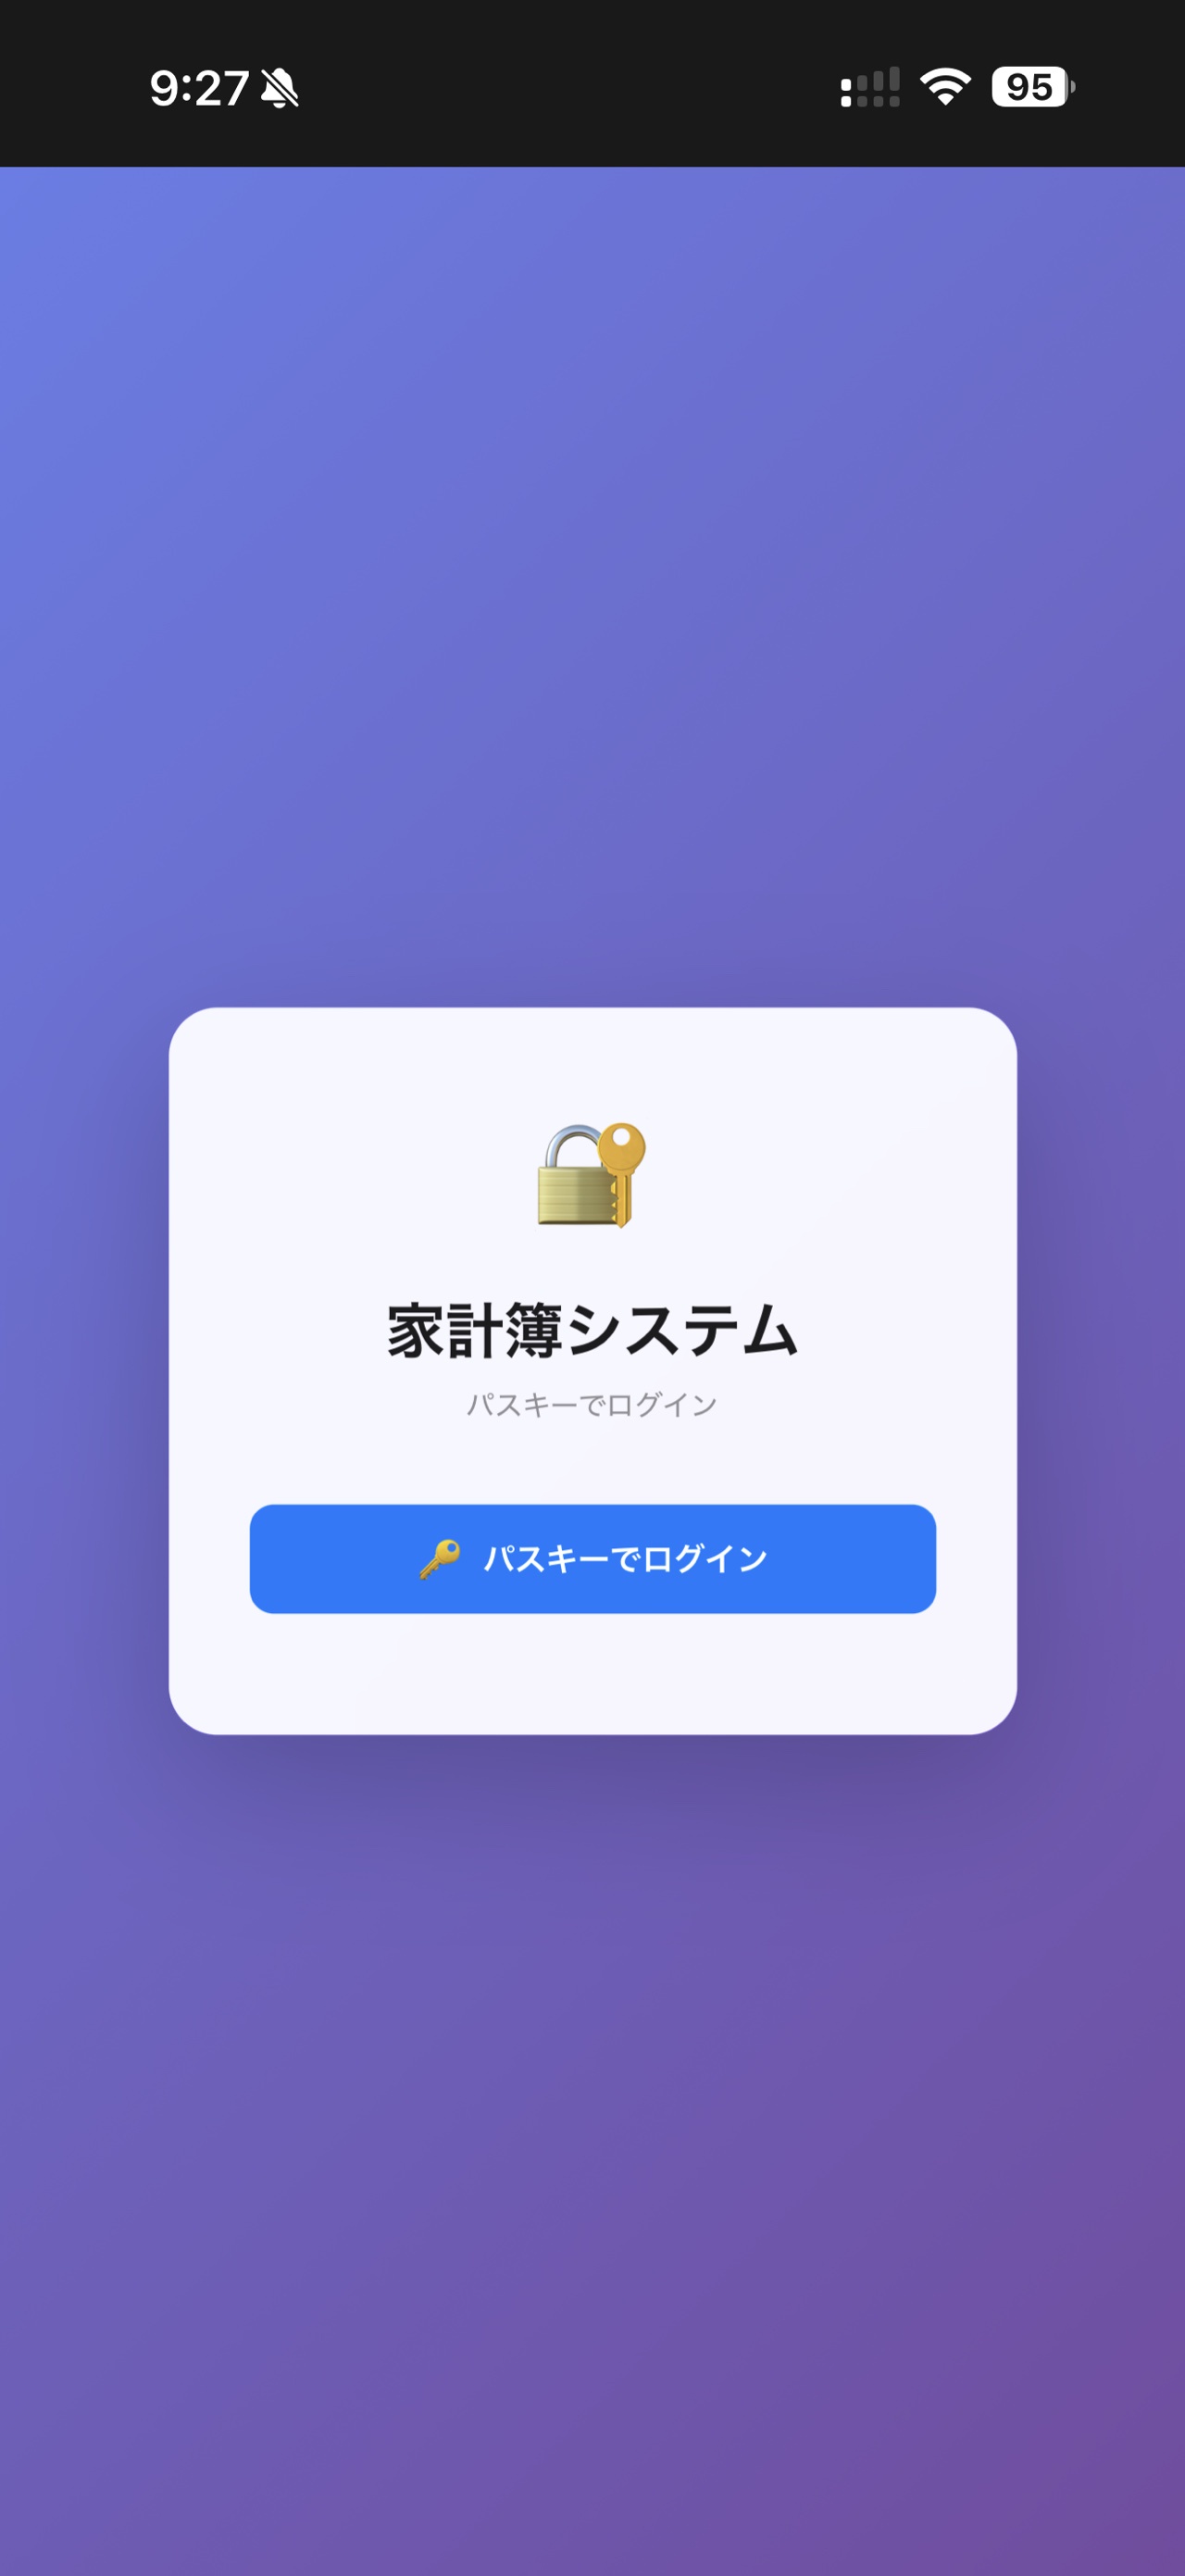
Passkey authentication via WebAuthn
Mobile-first UI
Category-based expense totals
Category customization
Tech Stack
This application is built with the following technologies:
Backend
- Flask: A lightweight Python web framework
- Pandas: Data processing and CSV operations
- WebAuthn: Passkey authentication (
webauthn>=2.0.0) - Cryptography: Encryption processing (
cryptography>=41.0.0)
Frontend
- Bootstrap 5: Responsive UI framework
- Font Awesome: Icons
- Apple Design System: Apple-inspired custom CSS
- Progressive Web App (PWA): Can be added to the phone’s home screen
Data Management
- CSV: Expense data storage (by year/month)
- JSON: Configuration data, user information, category information
Security
- HTTPS: SSL/TLS encrypted communication
- WebAuthn: FIDO2-compliant passkey authentication
- Session management: Secure Cookie, HTTPOnly, SameSite attributes
- IP BAN: Login attempt rate limiting
System Architecture Diagram
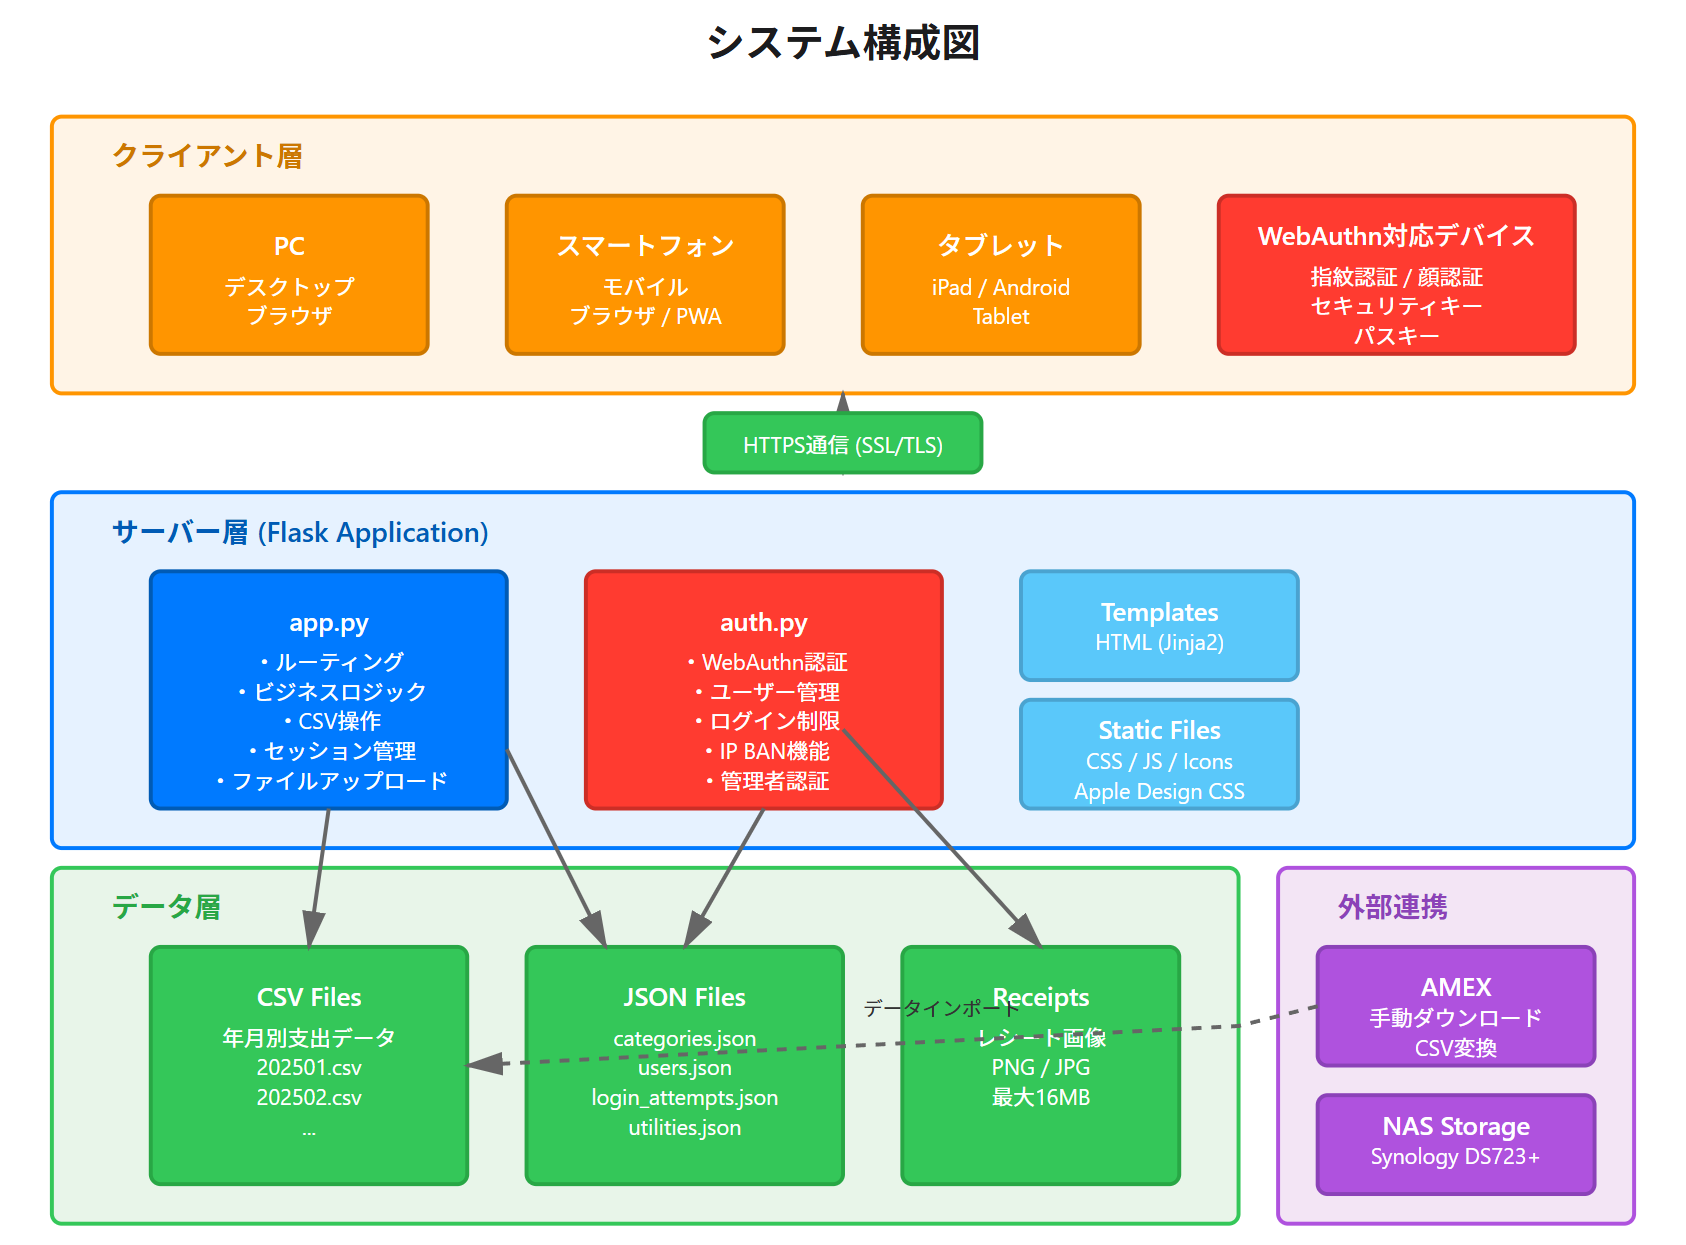
Project Structure
The project directory structure looks like this:
web_accounting/
├── app.py                     # Main application
├── auth.py                    # Authentication module (WebAuthn implementation)
├── requirements.txt           # Python dependencies
├── cert.pem / key.pem        # SSL certificates (for HTTPS)
├── templates/                # HTML templates
│   ├── base.html             # Base template
│   ├── index.html            # Expense entry screen
│   ├── view.html             # Records list screen
│   ├── login.html            # Login screen
│   ├── register.html         # User registration screen
│   ├── manage_categories.html # Category management screen
│   ├── manage_accounts.html   # Account management screen
│   └── manage_bans.html       # BAN management screen
├── static/                   # Static files
│   ├── apple-design.css      # Apple-inspired custom CSS
│   ├── icons/                # PWA icons
│   ├── manifest.json         # PWA manifest
│   └── sw.js                 # Service Worker
└── data/                     # Data directory
    ├── categories.json       # Category settings
    ├── users.json            # User information
    ├── login_attempts.json   # Login attempt records
    ├── csv/                  # Accounting data (monthly CSV)
    │   └── 2025/
    │       ├── 202501.csv
    │       └── 202502.csv
    └── receipts/             # Receipt image storage
Setup Instructions
1. Install Dependencies
First, install the required Python packages:
cd web_accounting
pip install -r requirements.txt
The requirements.txt looks like this:
flask
pandas
python-dateutil
webauthn>=2.0.0
cryptography>=41.0.0
Pretty straightforward.
2. Prepare the Data Directory
These are created automatically on first launch, but to create them manually:
mkdir -p data/csv data/receipts
3. Generate SSL Certificates (for HTTPS)
WebAuthn (passkey) authentication requires an HTTPS environment. Generate a self-signed certificate:
python generate_cert.py
This generates cert.pem and key.pem.
For production environments, I recommend using a proper certificate from Let’s Encrypt or similar.
4. Launch the Application
python app.py
By default, an HTTPS server starts on port 5000.
* Running on https://0.0.0.0:5000
5. Access via Browser
Access the app from your smartphone or PC browser at:
https://[server IP address]:5000
With a self-signed certificate, your browser will show a warning — proceed via “Advanced” then “Proceed to this site.”
6. Initial User Registration
On first access, a user registration screen is displayed. Register using a WebAuthn-capable device (fingerprint, face recognition, security key, etc.).
Since compromised passkeys would be a serious issue, in my environment I created a dedicated registration page protected by Cloudflare Access as an additional layer of defense.
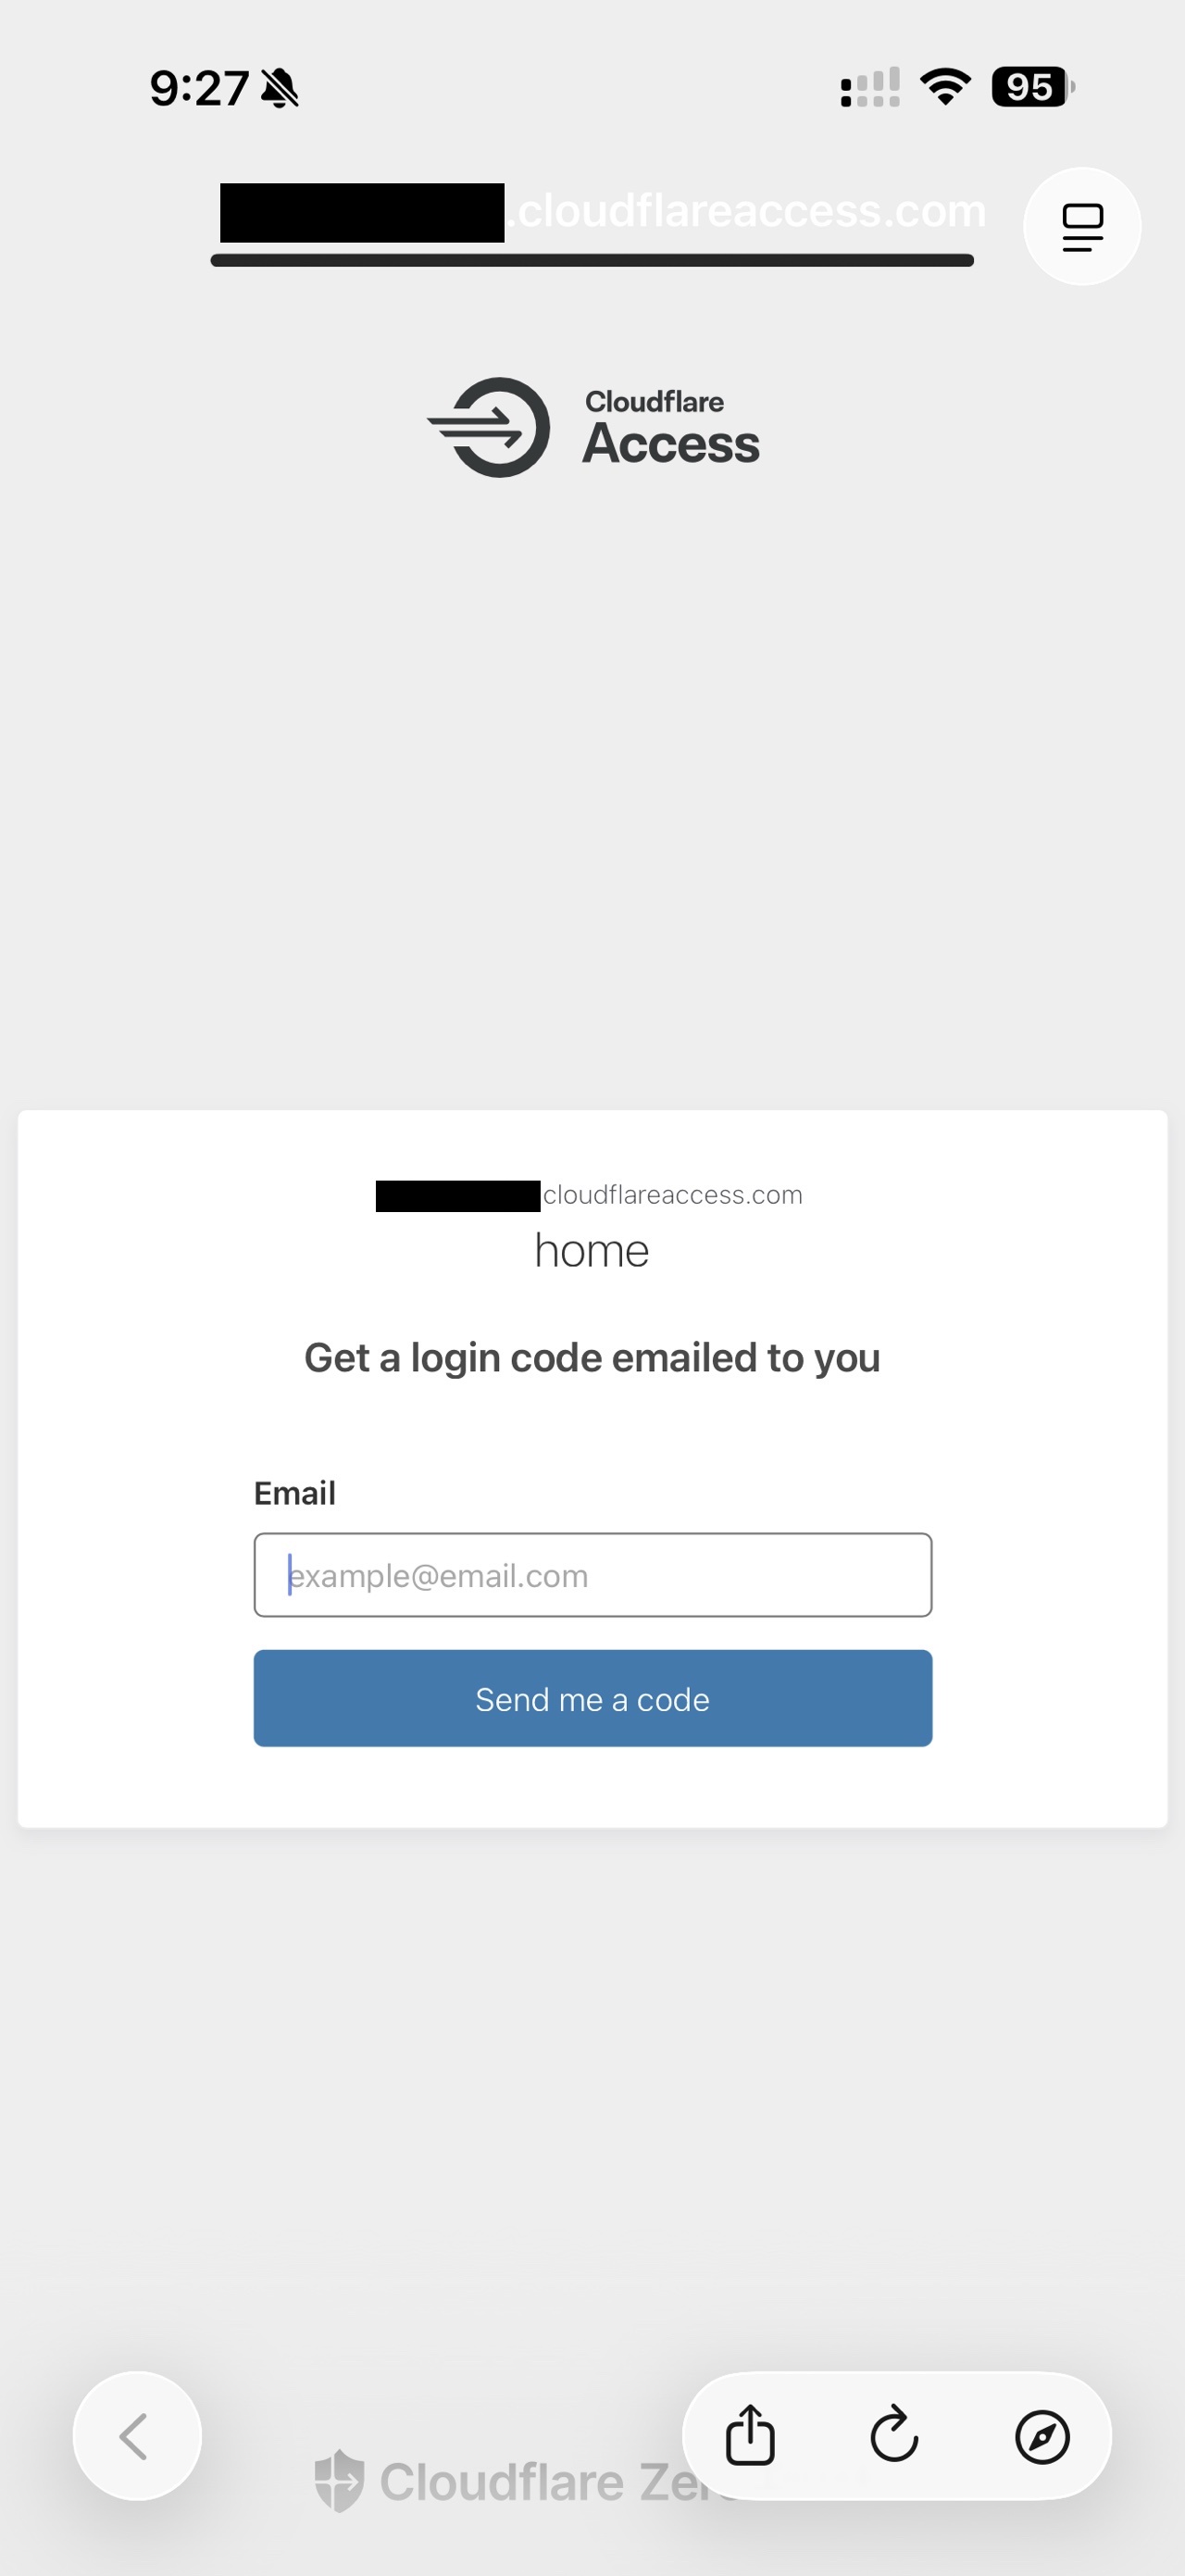
Username input
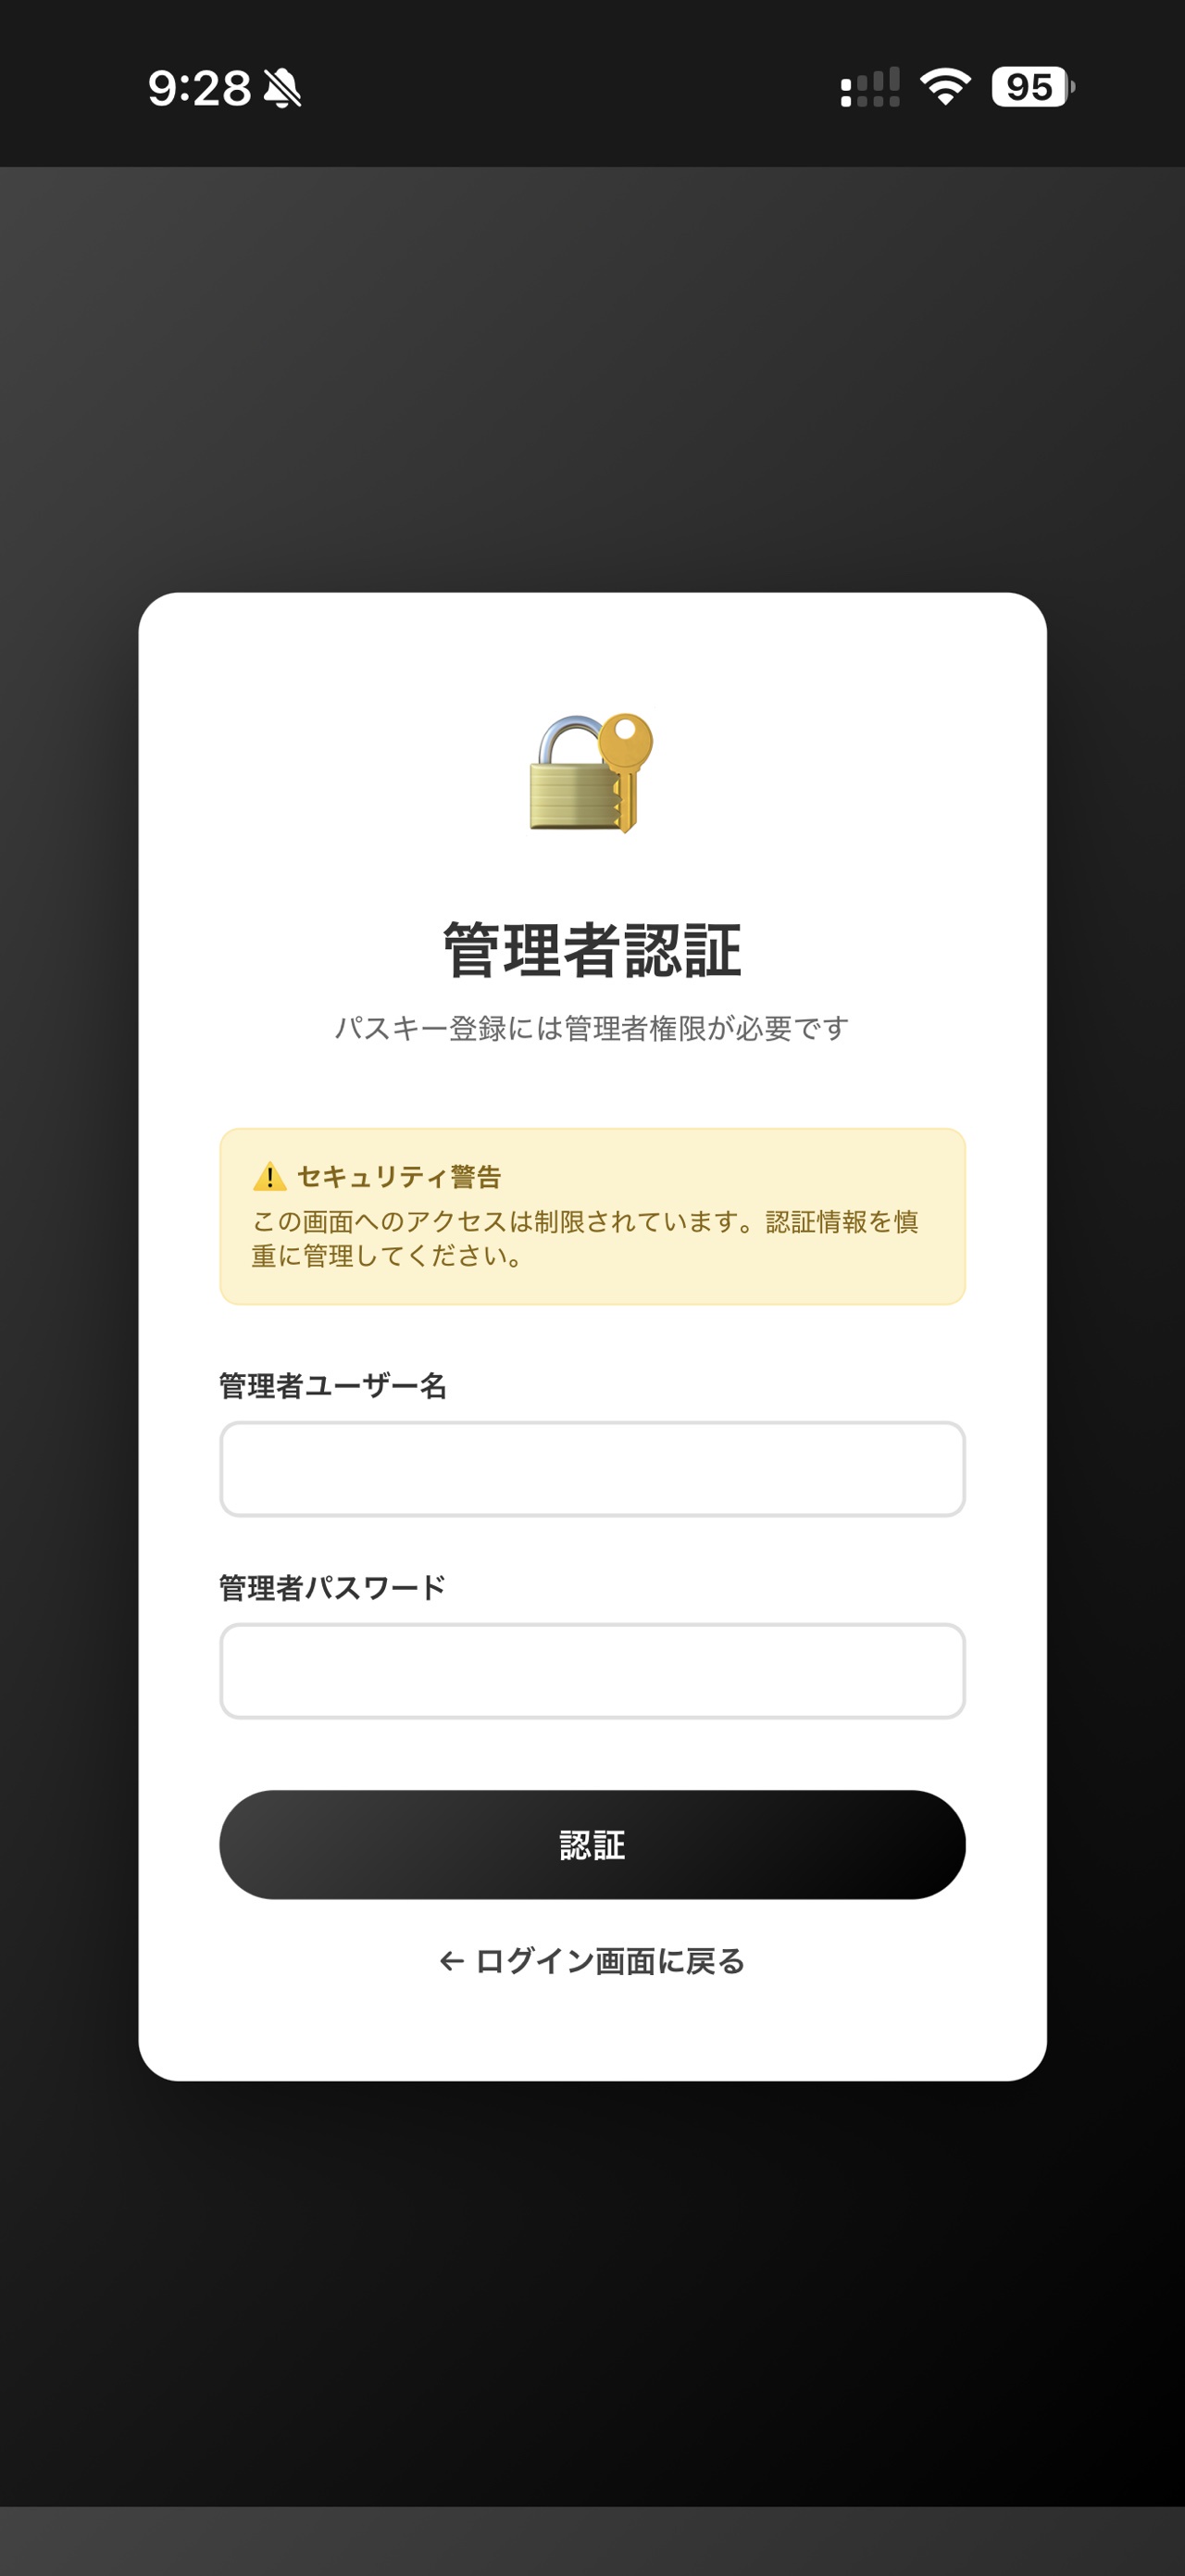
Passkey registration
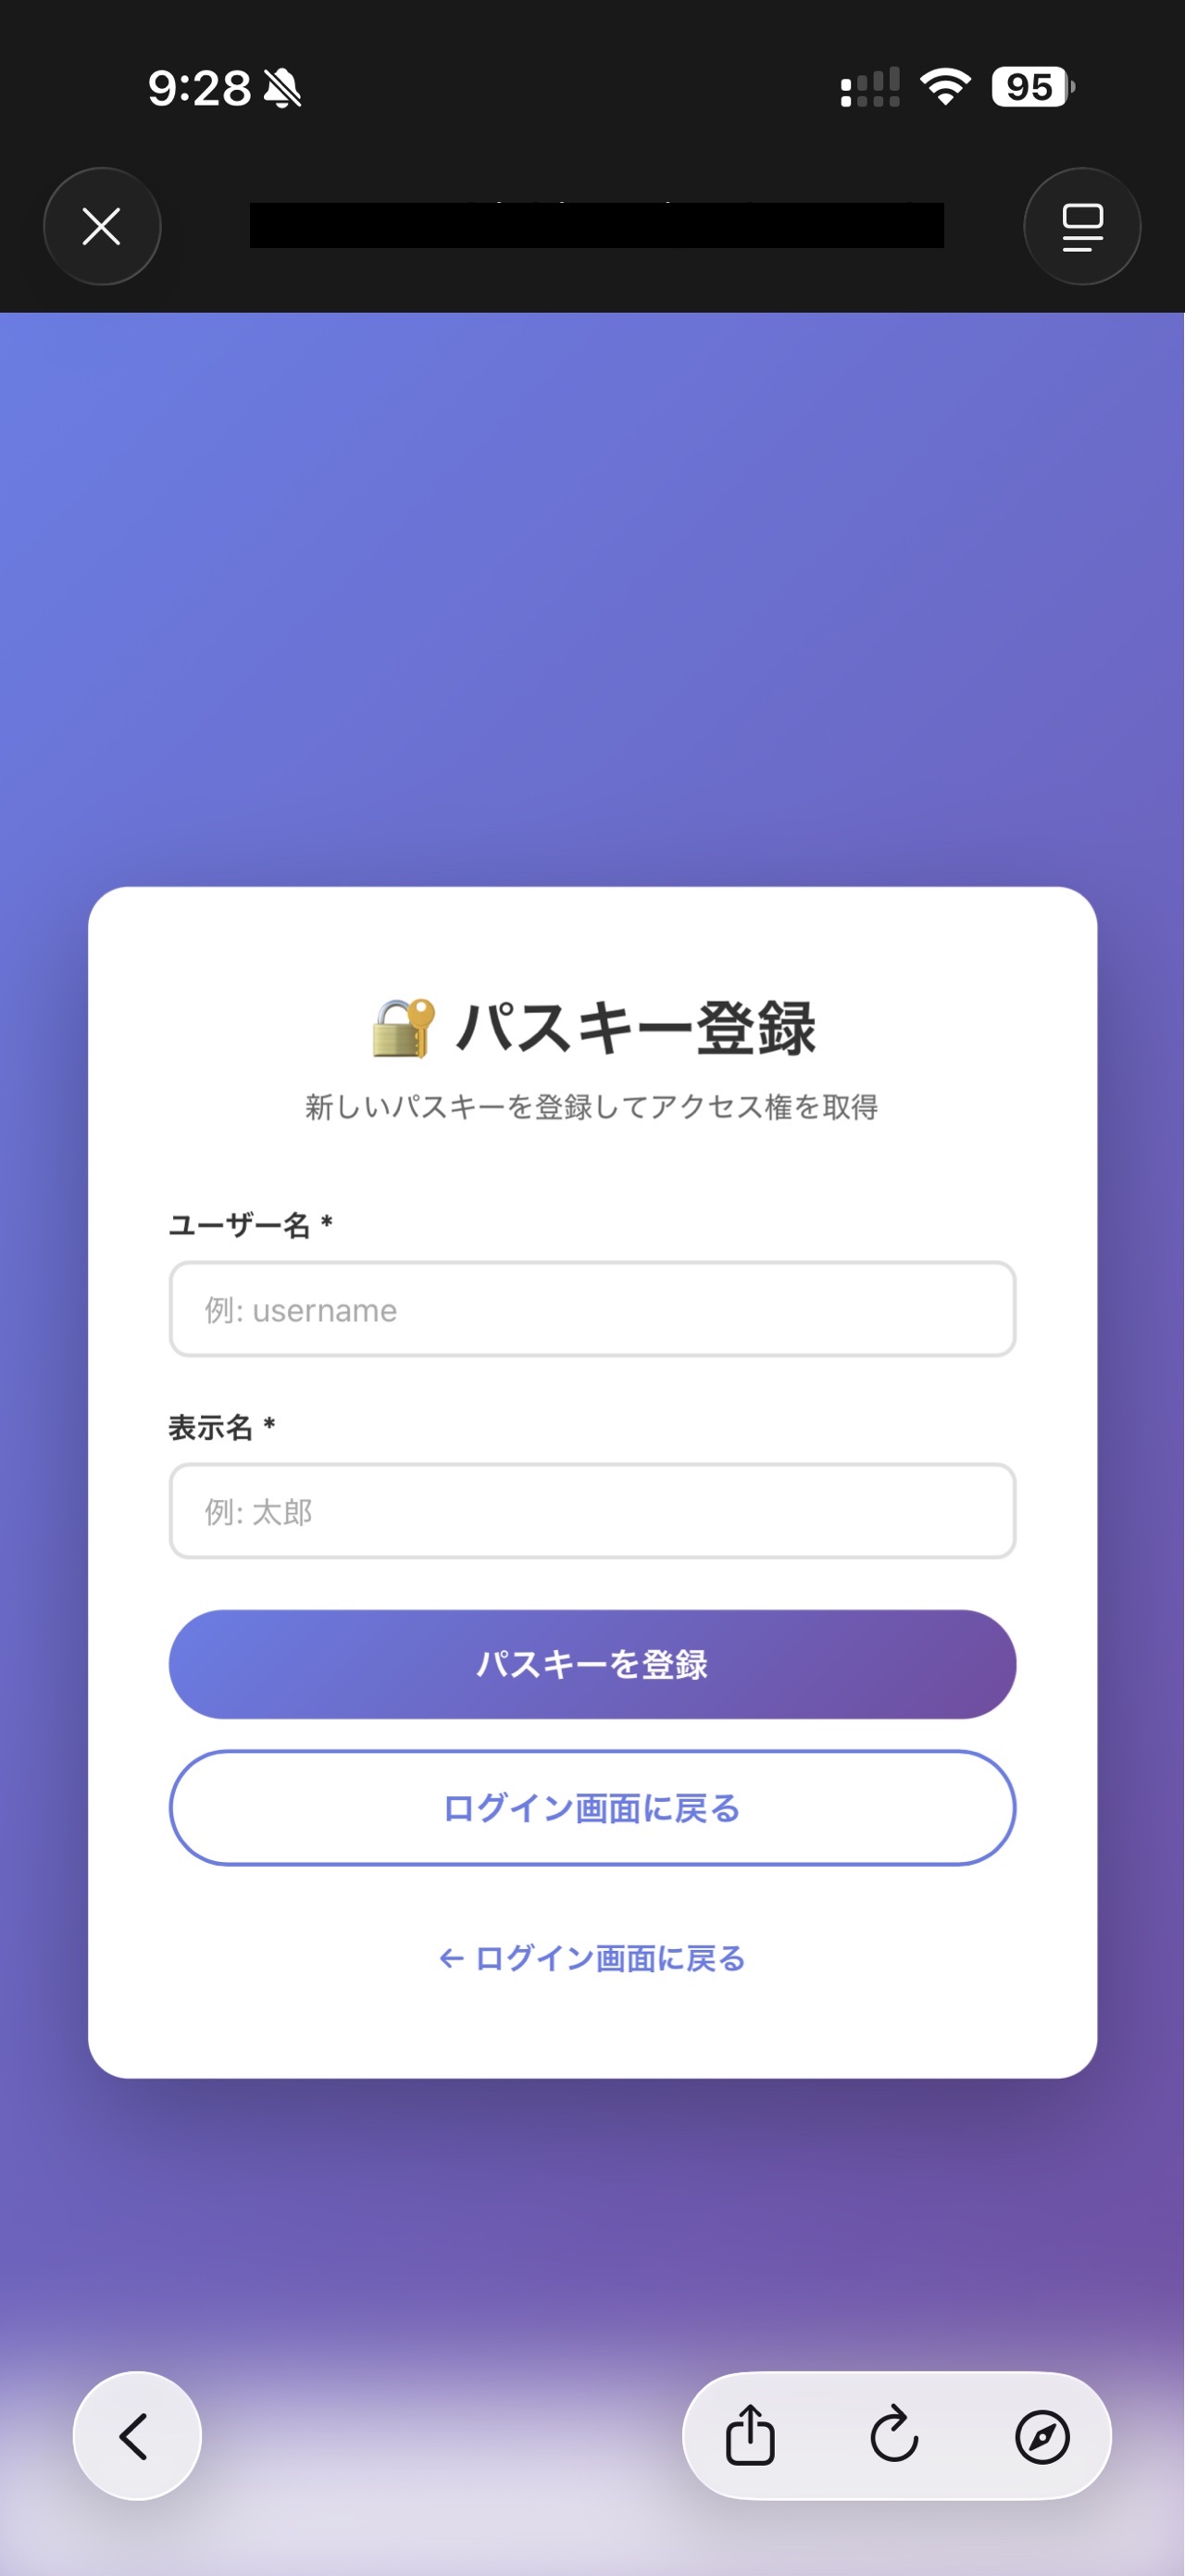
Registration complete
Implementation Details
Let’s dive into the implementation of the key features.
WebAuthn (Passkey) Authentication
One of the standout features of this app is WebAuthn (passkey) authentication. Instead of traditional password-based login, I implemented FIDO2-compliant biometric and security key authentication.
What is WebAuthn?
WebAuthn is a mechanism that allows you to securely log into websites and apps using biometric authentication (fingerprint, face recognition) or security keys. It eliminates the need to remember passwords and offers strong resistance against phishing attacks.
Recently, it’s become widely known under the name “passkeys,” promoted by Apple, Google, and Microsoft.
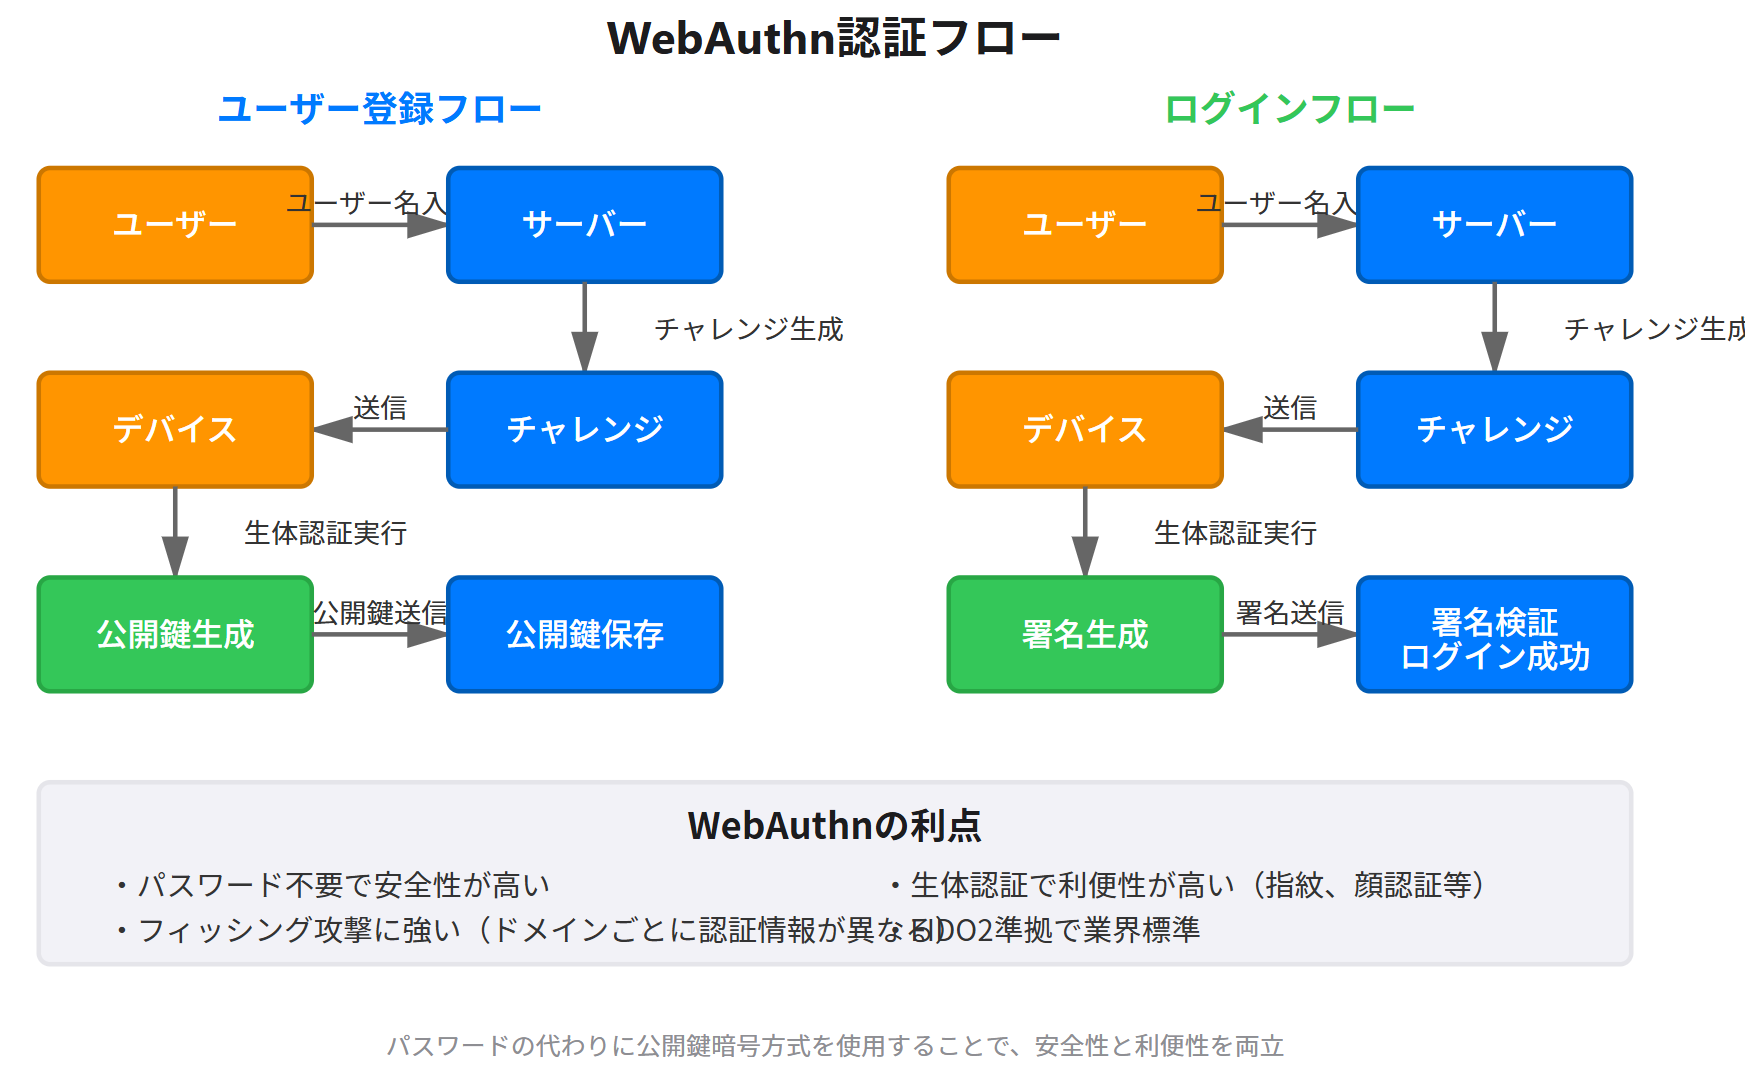
Authentication Flow
Implementation Highlights
The authentication logic is implemented in auth.py. Here are the key points:
from webauthn import (
    generate_registration_options,
    verify_registration_response,
    generate_authentication_options,
    verify_authentication_response,
)

# Challenge generation for user registration
def start_registration(username, user_id):
    # Start WebAuthn registration
    options = generate_registration_options(
        rp_id=get_rp_id(),
        rp_name="Household Budget System",
        user_id=user_id.encode('utf-8'),
        user_name=username,
        authenticator_selection=AuthenticatorSelectionCriteria(
            user_verification=UserVerificationRequirement.REQUIRED,
            resident_key=ResidentKeyRequirement.REQUIRED,
        ),
    )
    return options

# Challenge generation for login
def start_authentication(username):
    # Start WebAuthn authentication
    user = get_user_by_username(username)
    if not user:
        return None

    options = generate_authentication_options(
        rp_id=get_rp_id(),
        allow_credentials=[
            PublicKeyCredentialDescriptor(id=base64.b64decode(cred['id']))
            for cred in user['credentials']
        ],
    )
    return options
Using the webauthn>=2.0.0 library made the implementation relatively straightforward.
Authentication Flow Details
Here’s how the authentication process works:
- Registration flow
- User enters a username
- Server generates a challenge (random string)
- Browser calls the WebAuthn API and performs biometric authentication
- Public key is saved on the server
- Login flow
- User enters their username
- Server generates a challenge
- Browser calls the WebAuthn API and performs biometric authentication
- Server verifies the signature and completes login
Since no passwords are involved at all, it’s extremely secure.
Apple-Inspired UI Design
For the UI design, I created custom CSS inspired by the Apple Design System.
Design Concept
Apple’s design is known for being simple and refined. I incorporated the following elements:
- SF Pro Display-style system fonts
- Glassmorphism effects (semi-transparent cards)
- Vibrant accent colors (Apple Blue, Apple Orange, etc.)
- Smooth animations (cubic-bezier easing)
- Generous spacing and rounded corners
Custom CSS Example
static/apple-design.css defines the Apple-inspired styles:
:root {
    --apple-blue: #007AFF;
    --apple-gray: #F2F2F7;
    --apple-border: #E5E5EA;
    --apple-text: #1C1C1E;
    --apple-red: #FF3B30;
    --apple-green: #34C759;
    --apple-orange: #FF9500;
}

/* Glassmorphism effect */
.glass-card {
    background: rgba(255, 255, 255, 0.8);
    backdrop-filter: saturate(180%) blur(20px);
    -webkit-backdrop-filter: saturate(180%) blur(20px);
    border: 0.5px solid rgba(255, 255, 255, 0.3);
}

/* Apple-style hover effect */
.apple-hover {
    transition: all 0.2s cubic-bezier(0.4, 0, 0.2, 1);
}

.apple-hover:hover {
    transform: scale(1.02);
}

.apple-hover:active {
    transform: scale(0.98);
}
The glassmorphism effect using backdrop-filter is commonly seen in modern Apple designs. It looks especially beautiful on mobile devices.
Responsive Design
Since the app is designed mobile-first, mobile usability takes priority:
- Touch-optimized button sizes
- Swipe gesture support
- Floating action button (FAB) for quick input
- Larger font sizes for better readability
By combining these with Bootstrap 5’s grid system, the layout adapts optimally to different screen sizes.
Expense Tracking
Let’s look at the core feature: expense tracking.
Input Form
templates/index.html contains the expense entry form:
<form action="{{ url_for('add_expense') }}" method="POST" enctype="multipart/form-data">
    <div class="row">
        <!-- Date -->
        <div class="col-md-6 mb-3">
            <label for="date" class="form-label">
                <i class="fas fa-calendar me-1"></i>Date
            </label>
            <input type="date" class="form-control" id="date" name="date" required>
        </div>

        <!-- Store -->
        <div class="col-md-6 mb-3">
            <label for="shop" class="form-label">
                <i class="fas fa-store me-1"></i>Store
            </label>
            <input type="text" class="form-control" id="shop" name="shop" required>
        </div>

        <!-- Category -->
        <div class="col-md-6 mb-3">
            <label for="category" class="form-label">
                <i class="fas fa-tags me-1"></i>Category
            </label>
            <select class="form-select" id="category" name="category" required>
                <option value="">Select category</option>
                {% for cat in categories %}
                    <option value="{{ cat }}">{{ cat }}</option>
                {% endfor %}
            </select>
        </div>

        <!-- Payment Method -->
        <div class="col-md-6 mb-3">
            <label for="payment_method" class="form-label">
                <i class="fas fa-credit-card me-1"></i>Payment Method
            </label>
            <select class="form-select" id="payment_method" name="payment_method" required>
                <!-- Omitted -->
            </select>
        </div>

        <!-- Amount -->
        <div class="col-md-6 mb-3">
            <label for="amount" class="form-label">
                <i class="fas fa-yen-sign me-1"></i>Amount
            </label>
            <input type="number" class="form-control" id="amount" name="amount" required>
        </div>
    </div>
</form>
Font Awesome icons on each input field make the form visually intuitive.
Data Storage
The add_expense() function in app.py saves input data to CSV files:
@app.route('/add', methods=['POST'])
@login_required
def add_expense():
    # Add an expense record
    # Get form data
    date = request.form.get('date')
    shop = request.form.get('shop')
    category = request.form.get('category')
    payment_method = request.form.get('payment_method')
    amount = request.form.get('amount')

    # Extract year-month
    year_month = datetime.strptime(date, '%Y-%m-%d').strftime('%Y%m')

    # Generate CSV file path
    csv_path = os.path.join(CSV_BASE_DIR, f"{year_month[:4]}", f"{year_month}.csv")

    # Create new record
    new_record = {
        'Date': date,
        'Store': shop,
        'Category': category,
        'Payment Method': payment_method,
        'Amount': amount,
    }

    # Append to CSV
    # (detailed code omitted)

    flash('Record added', 'success')
    return redirect(url_for('index'))
Data is stored as CSV files organized by year and month, making it easy to analyze later with tools like Excel.
Category Management
Categories are managed via data/categories.json:
{
  "categories": [
    "Food (Home)",
    "Food (Dining Out)",
    "Daily Necessities",
    "Consumables",
    "Medical Expenses",
    "Transportation",
    "Other"
  ],
  "payment_method": [
    "Credit Card",
    "Cash",
    "E-Money"
  ]
}
Categories can be added, deleted, and reordered from the admin screen.
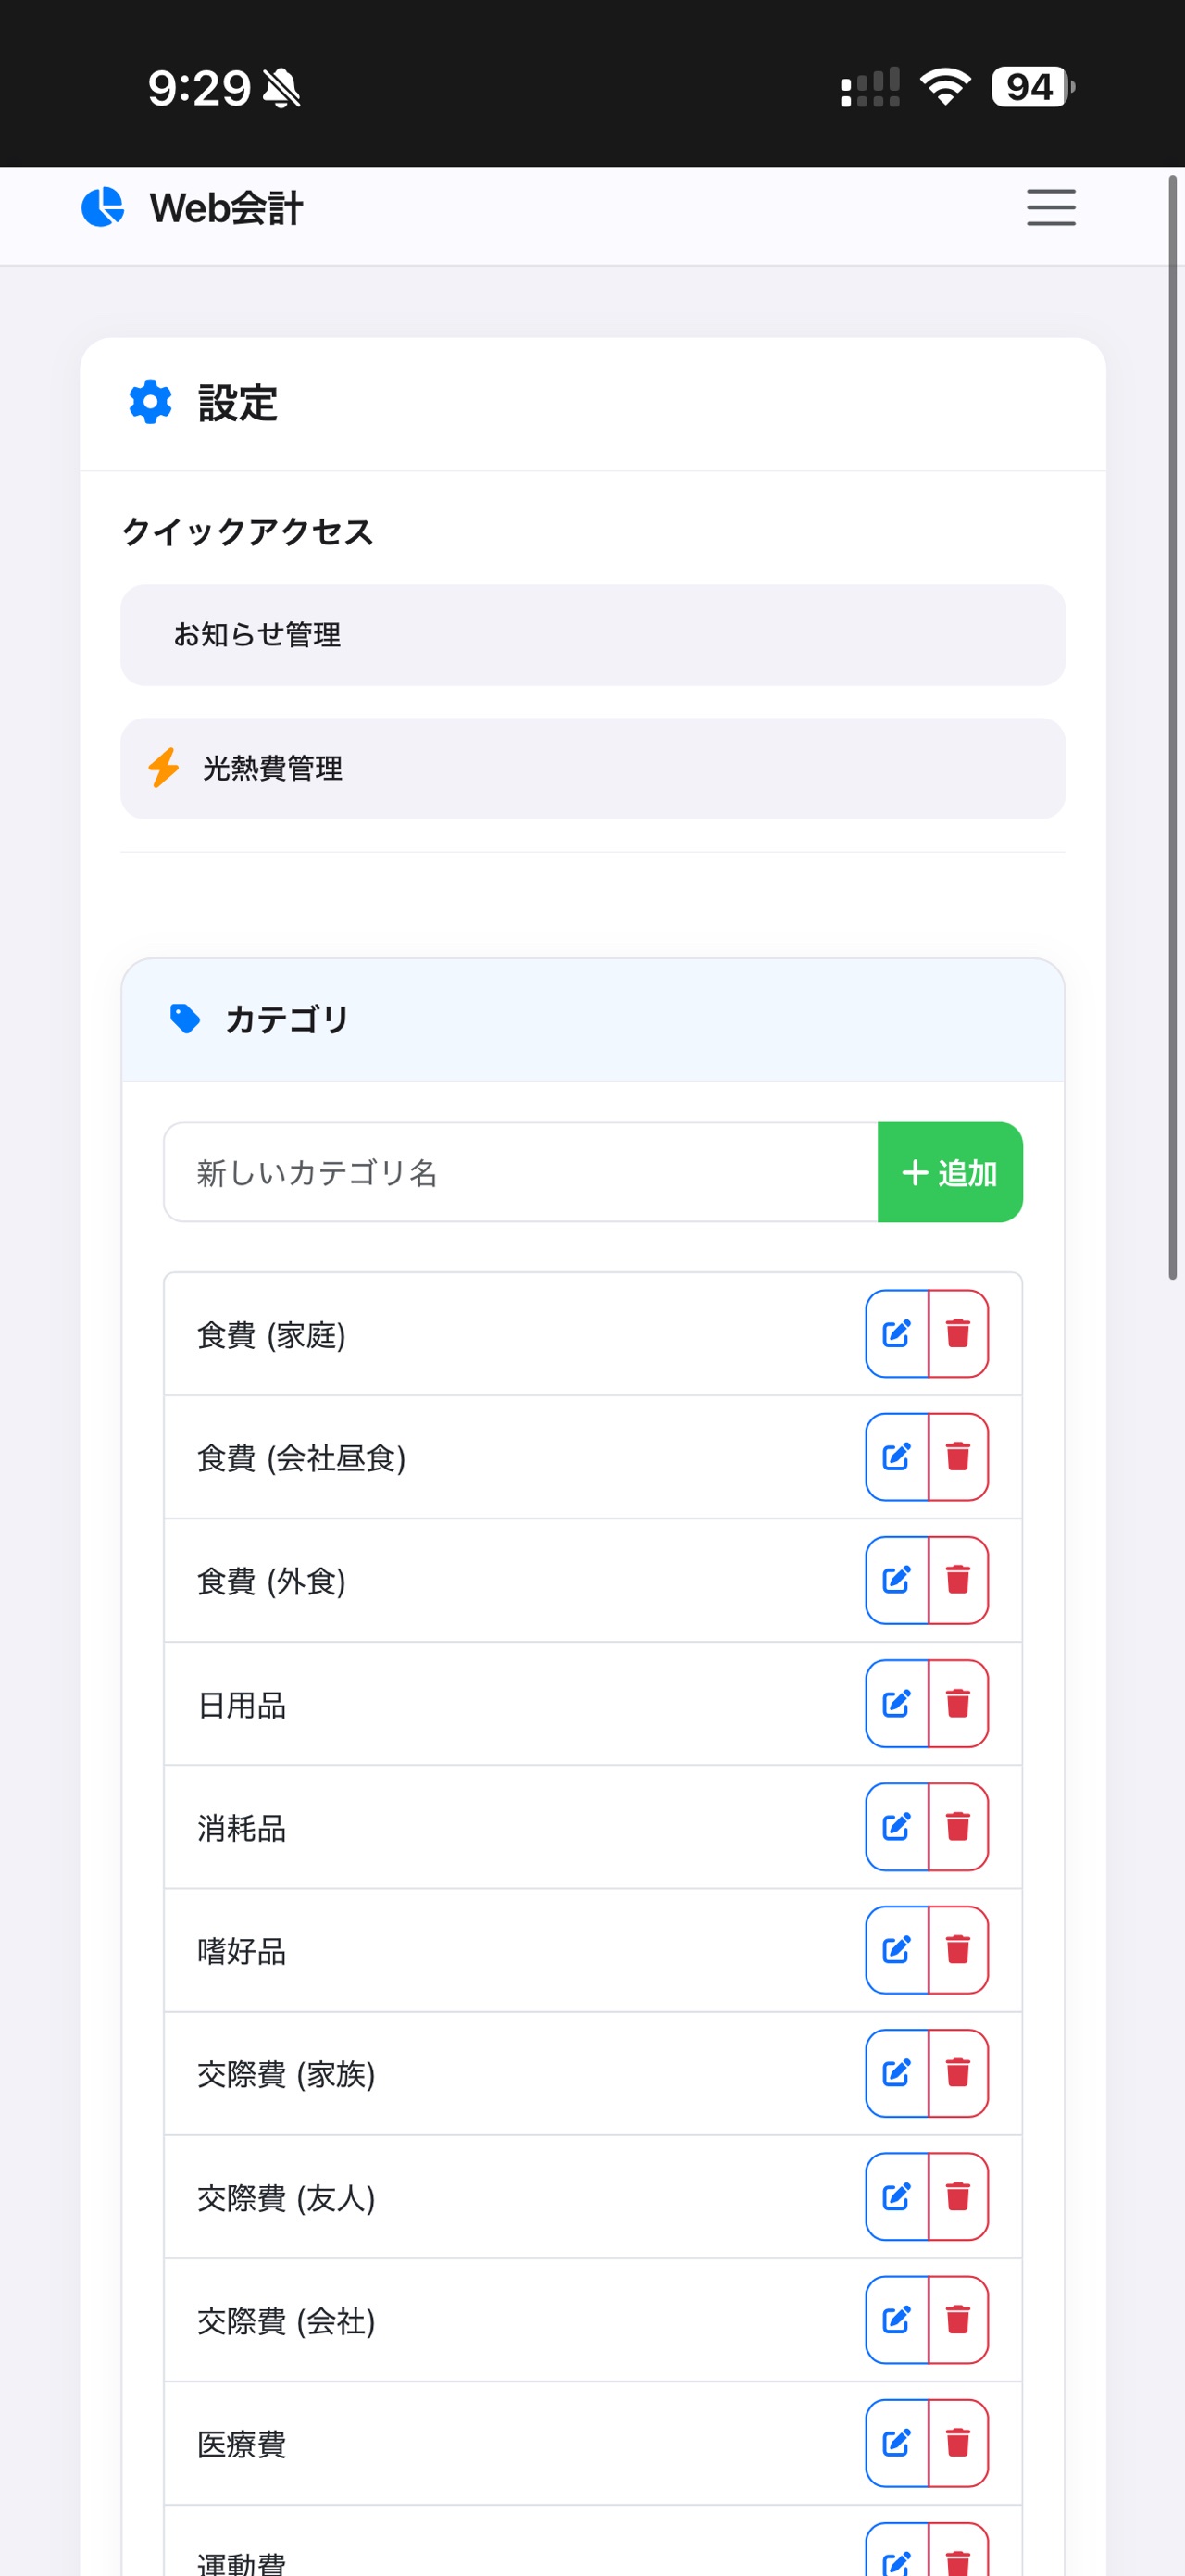
Category list
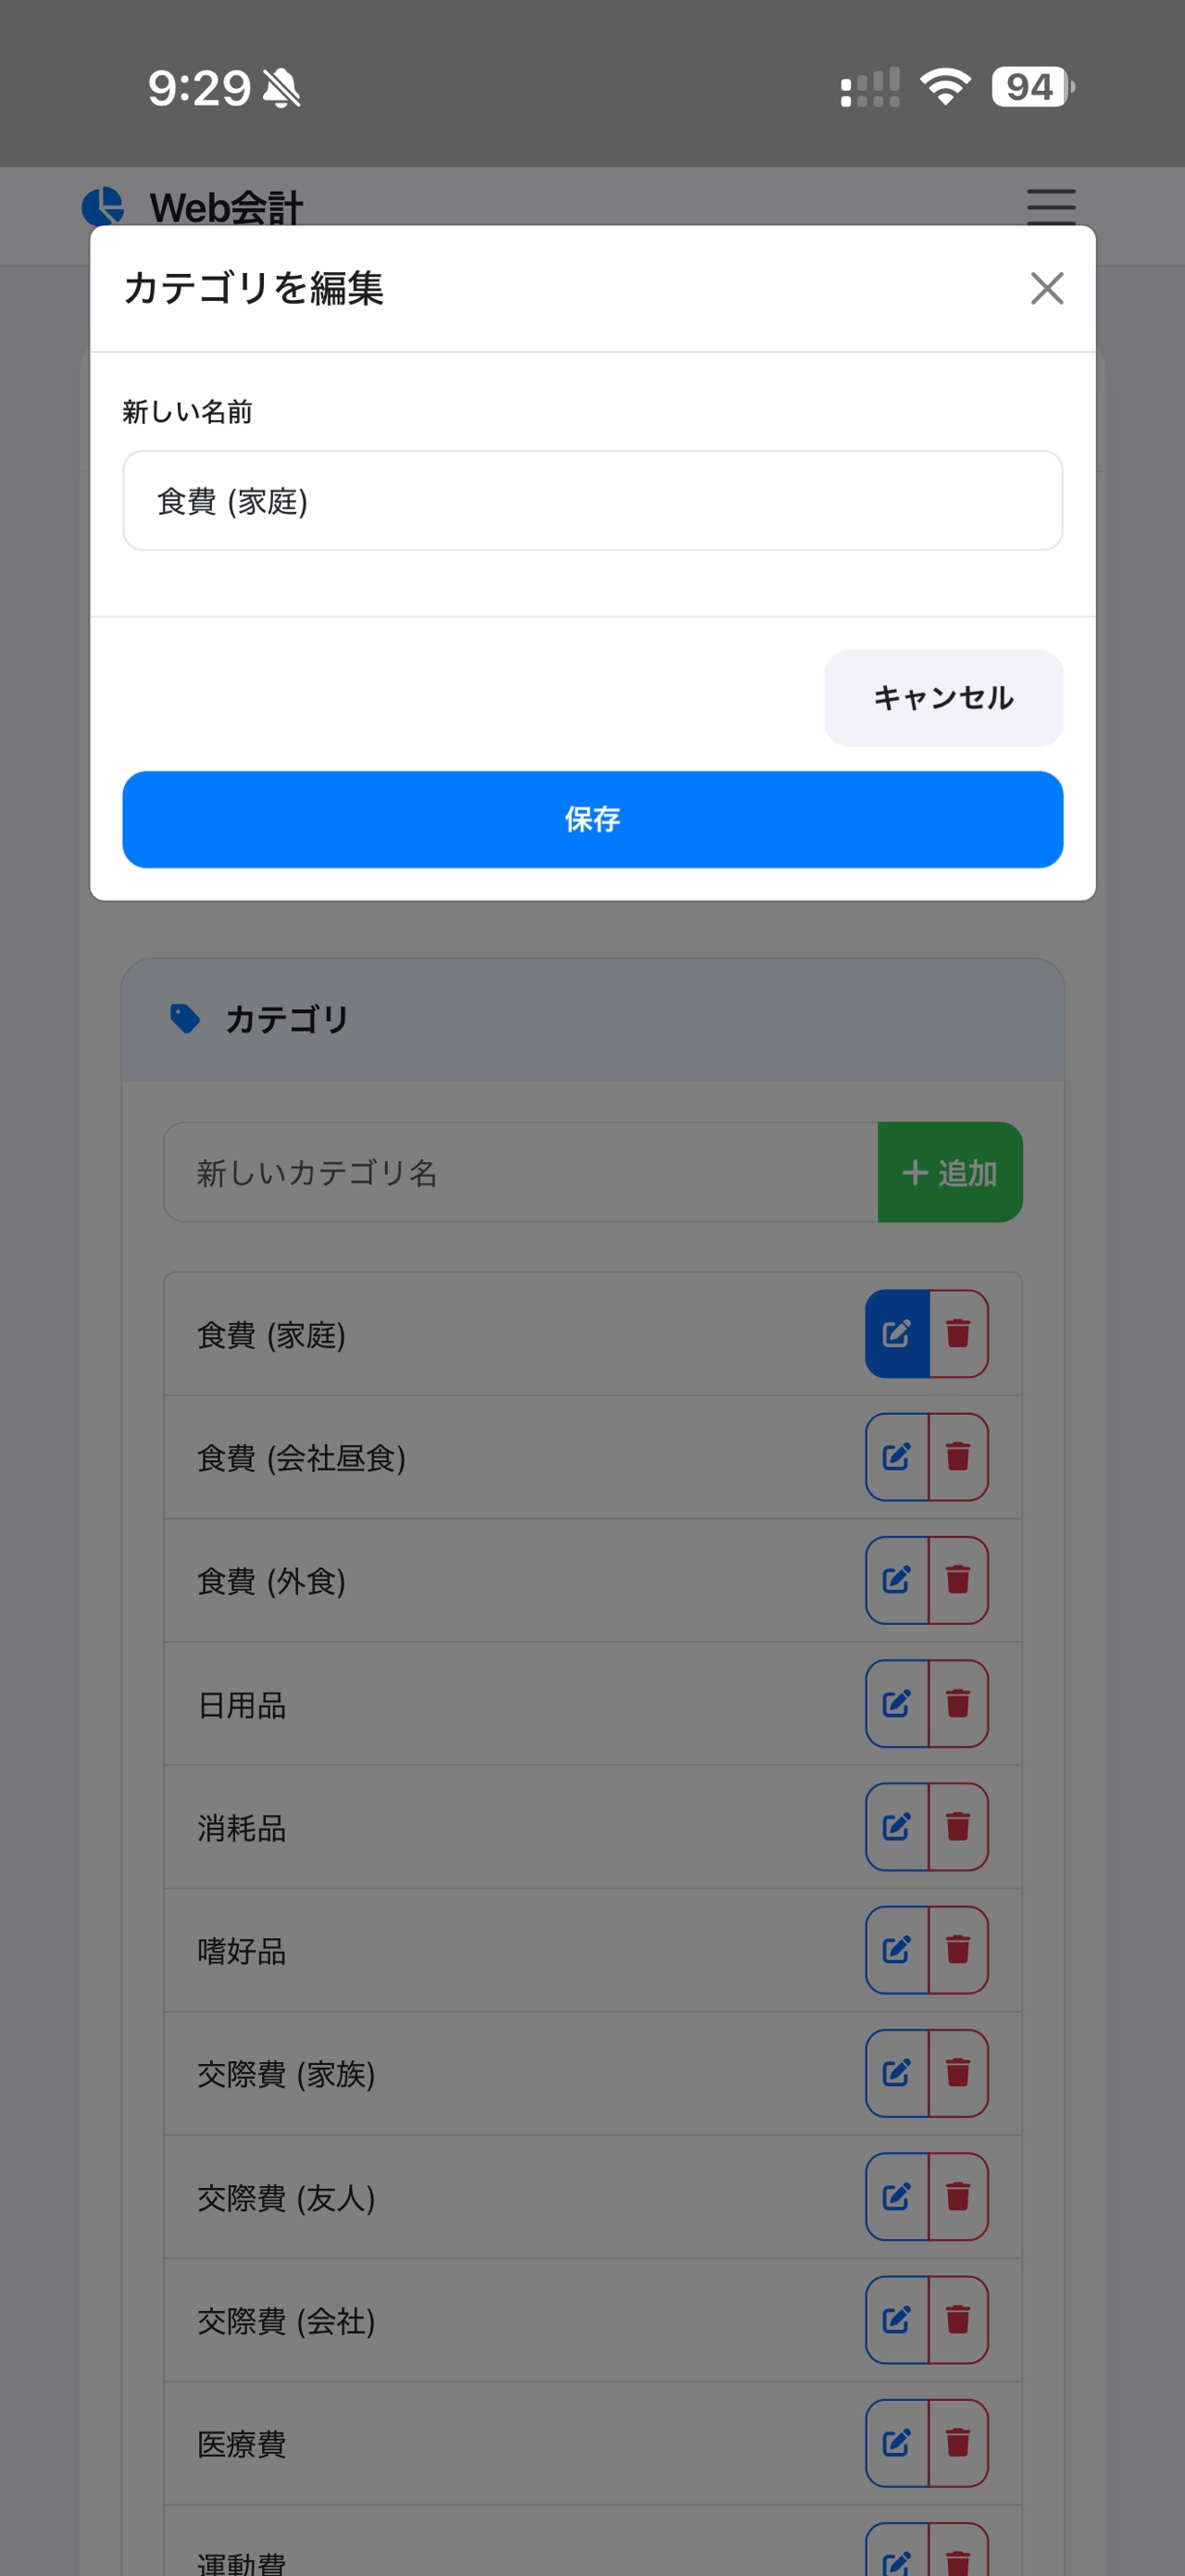
Drag & drop reordering
Login Restriction / BAN Feature
As a security measure, I implemented a login attempt limiter and an IP BAN system.
How It Works
- Maximum attempts: 5
- BAN duration: 24 hours
- Attempt count reset: After 30 minutes of no login attempts
Implemented in auth.py:
# Login restriction settings
MAX_LOGIN_ATTEMPTS = 5
BAN_DURATION_HOURS = 24
ATTEMPT_RESET_MINUTES = 30

def is_ip_banned(ip_address):
    # Check if an IP address is banned
    ban_data = load_ban_list()
    current_time = datetime.now()

    for ban_entry in ban_data['banned_ips']:
        if ban_entry['ip'] == ip_address:
            ban_time = datetime.fromisoformat(ban_entry['banned_at'])
            ban_until = ban_time + timedelta(hours=BAN_DURATION_HOURS)

            if current_time < ban_until:
                return True, ban_until

    return False, None

def record_login_attempt(ip_address, success=False):
    # Record a login attempt
    attempts_data = load_login_attempts()

    if success:
        # Clear attempt records on success
        if ip_address in attempts_data['attempts']:
            del attempts_data['attempts'][ip_address]
    else:
        # Increment attempt count on failure
        if ip_address not in attempts_data['attempts']:
            attempts_data['attempts'][ip_address] = []

        attempts_data['attempts'][ip_address].append({
            'timestamp': datetime.now().isoformat()
        })

        # BAN if max attempts exceeded
        if len(attempts_data['attempts'][ip_address]) >= MAX_LOGIN_ATTEMPTS:
            ban_ip(ip_address)

    save_login_attempts(attempts_data)
This effectively prevents brute force attacks. The admin screen also provides the ability to view and unban IP addresses.
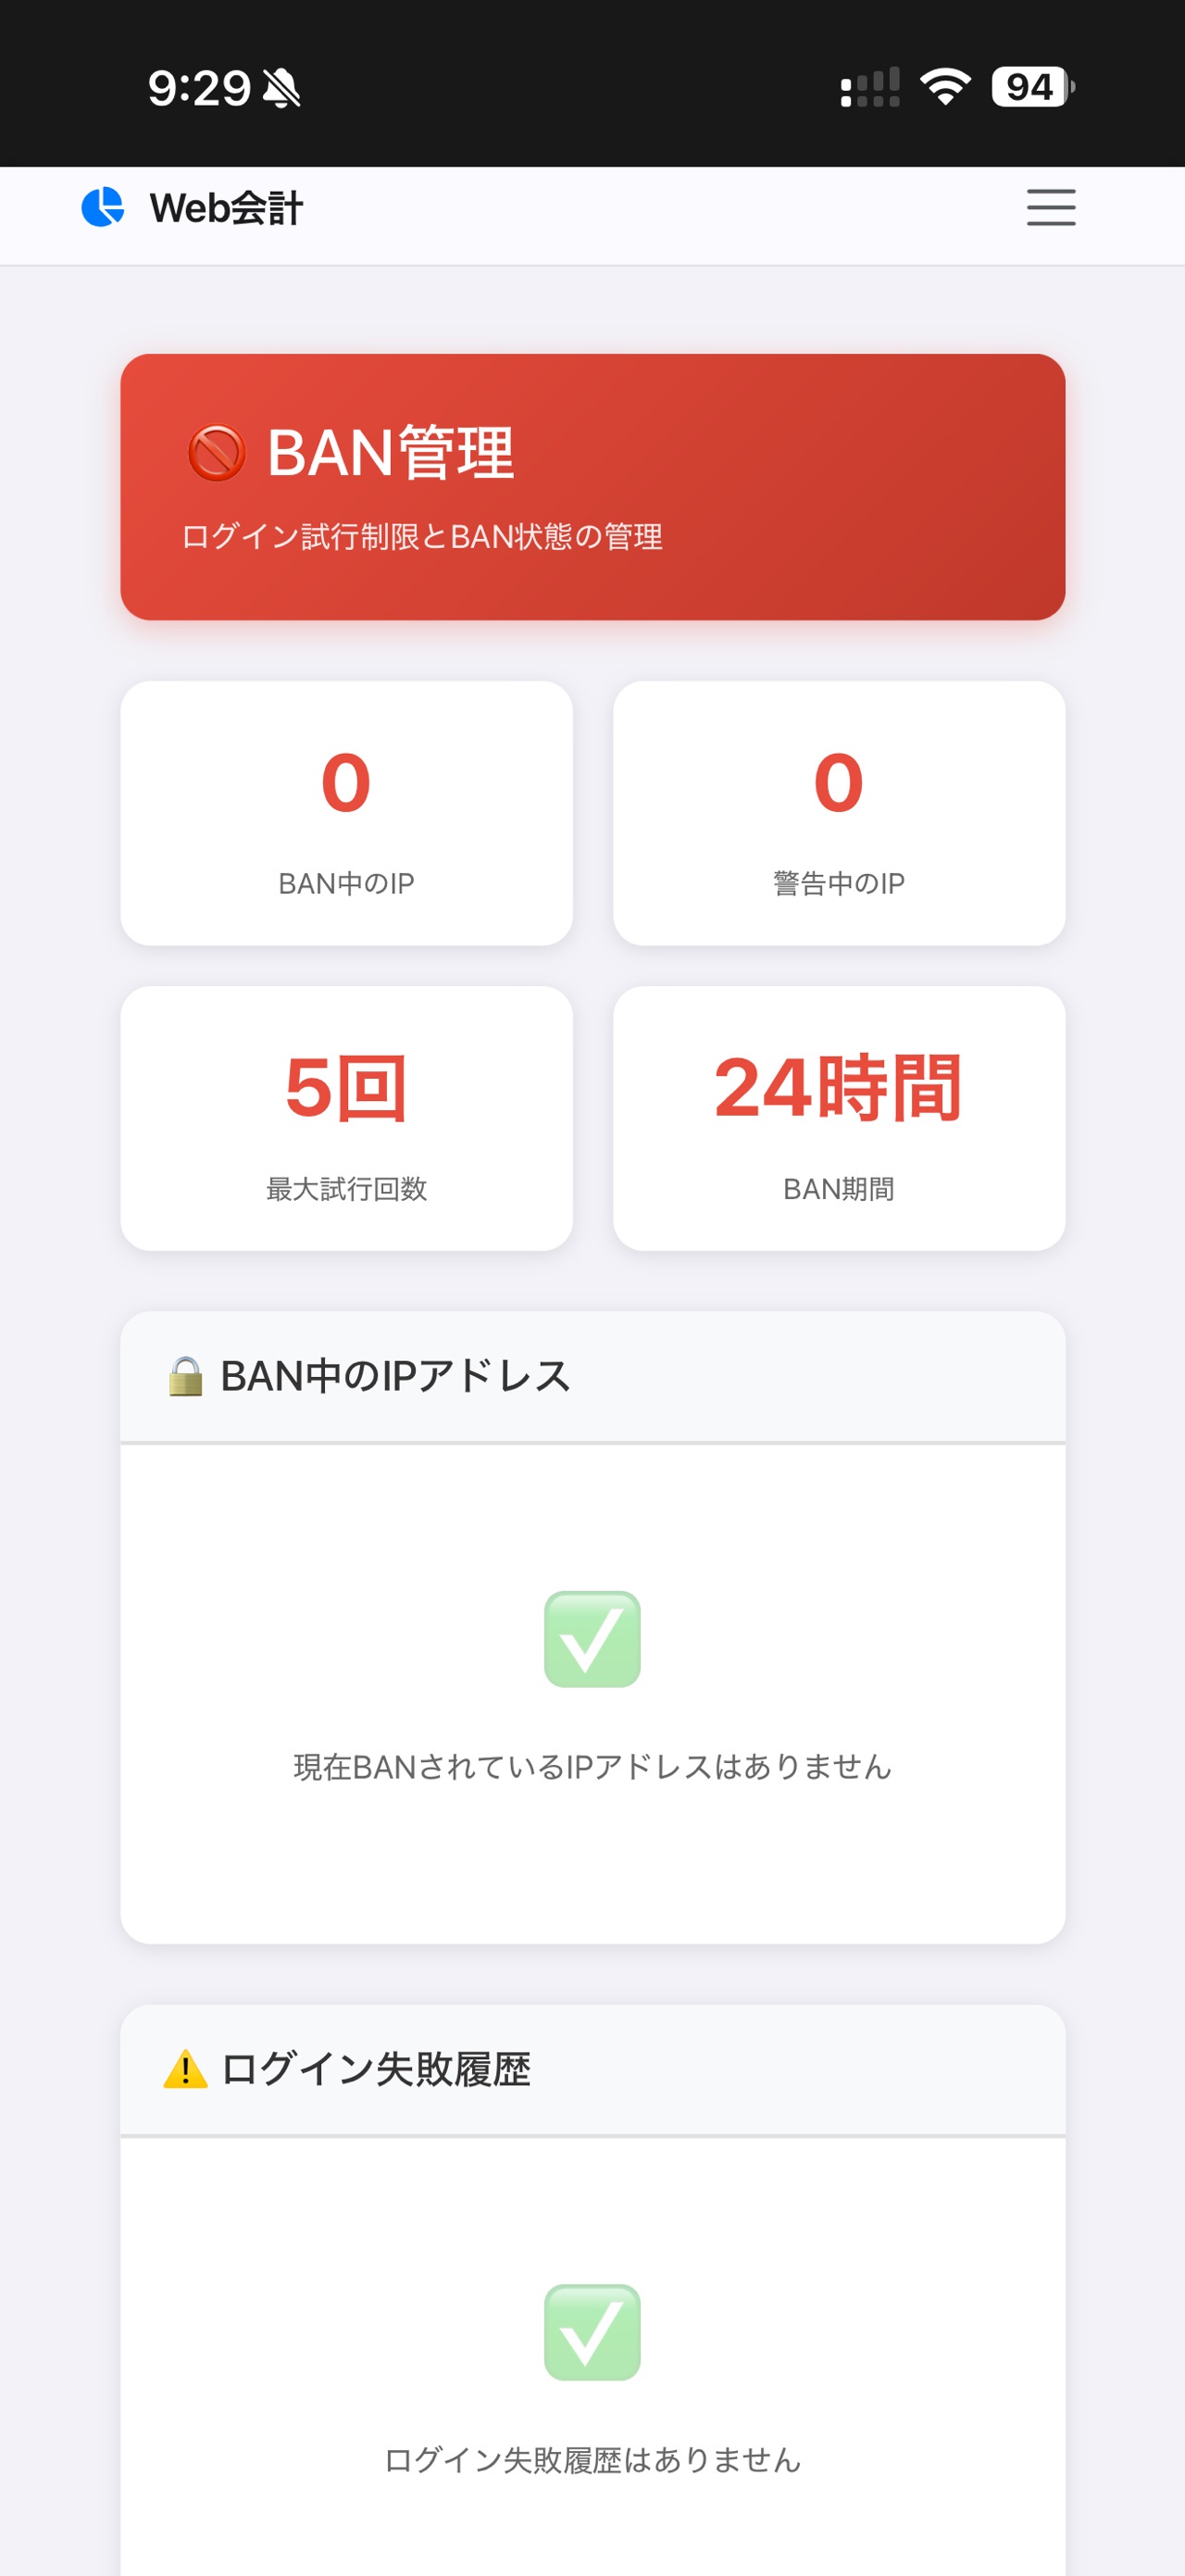
Manual AMEX Data Import
I also implemented a system for manually importing American Express credit card statements.
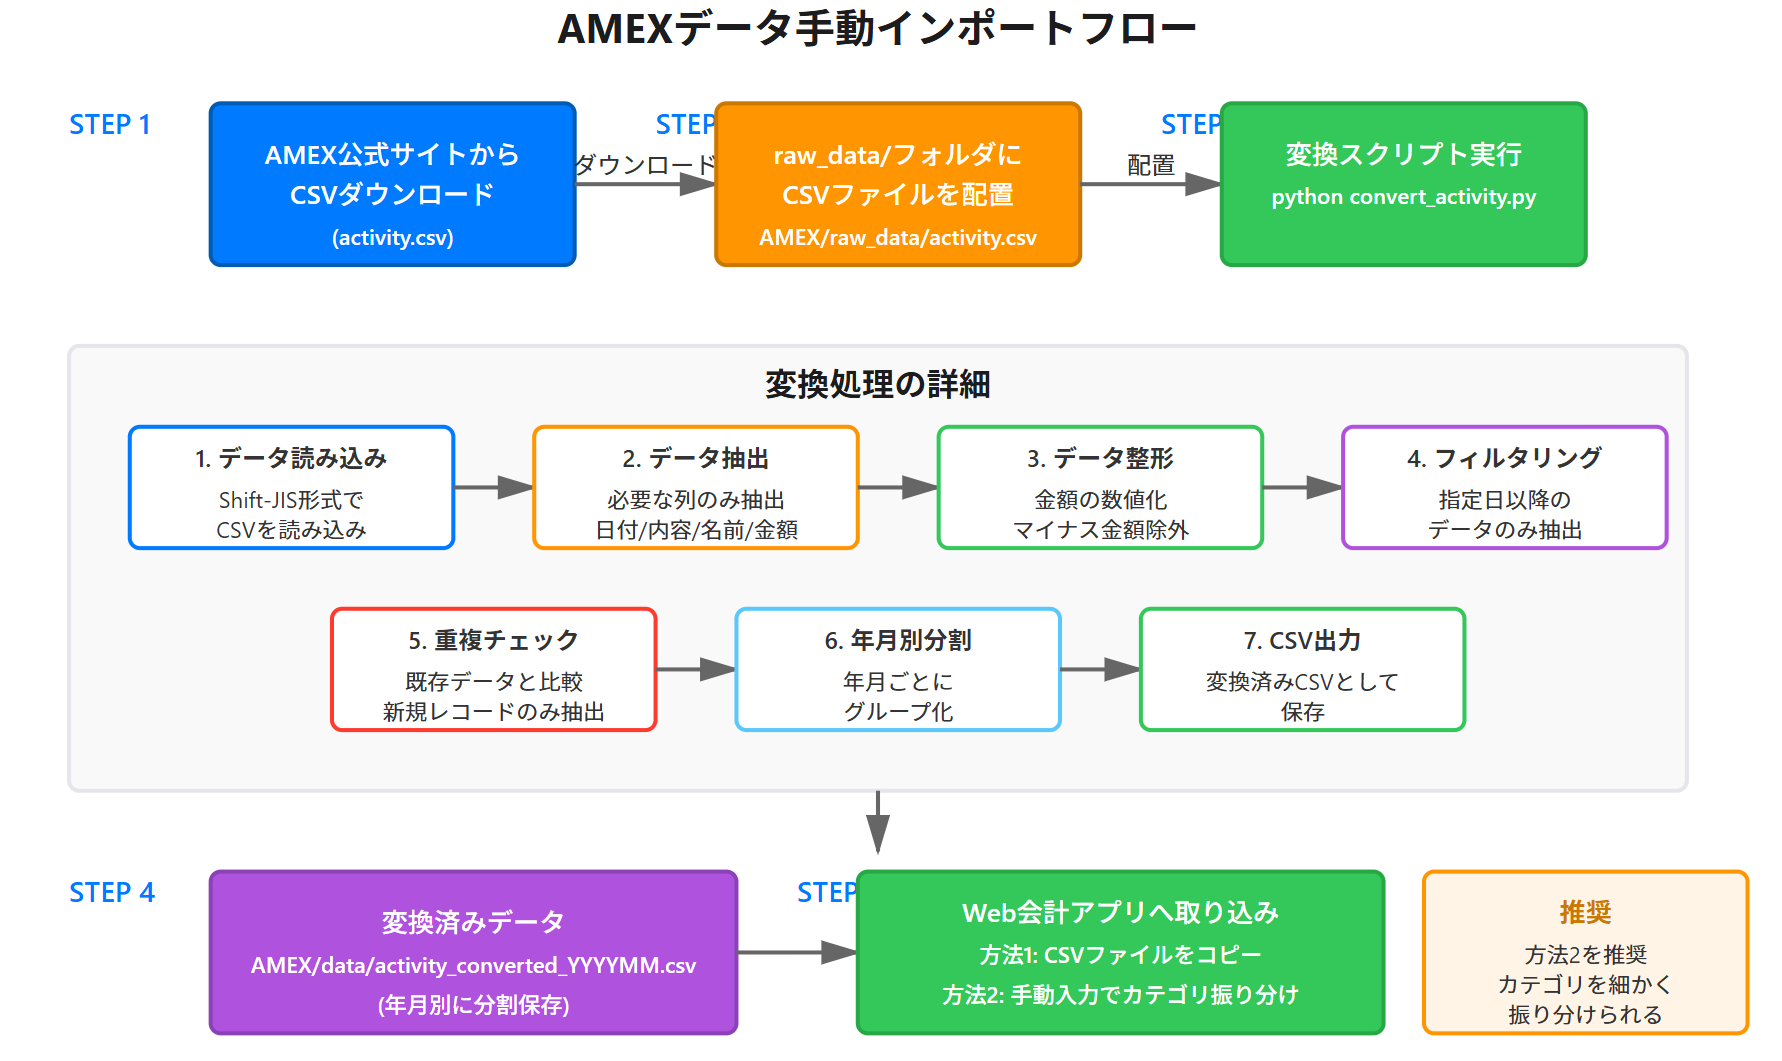
Workflow
- Download statements from the AMEX site
- Log in to the American Express official site
- Go to “Statements” then “Download”
- Download in CSV format (filename:
activity.csv)
- Run the conversion script
- Place the downloaded CSV in the
AMEX/raw_data/folder - Run the conversion script:
- Place the downloaded CSV in the
cd AMEX
python convert_activity.py
- Verify the converted data
- Monthly CSV files are generated in the
AMEX/data/folder - Example filename:
activity_converted_202501.csv
- Monthly CSV files are generated in the
What convert_activity.py Does
The conversion script performs the following:
import pandas as pd
import os

def convert_activity_data():
    # Convert AMEX data
    # Load source data (Shift-JIS encoding)
    df = pd.read_csv('raw_data/activity.csv', encoding='shift_jis')

    # Extract only required columns
    required_columns = ['Transaction Date', 'Description', 'Card Member Name', 'Amount']
    df_filtered = df[required_columns].copy()

    # Convert amount to numeric (remove commas)
    df_filtered['Amount'] = df_filtered['Amount'].str.replace(',', '').astype(float)

    # Exclude negative amounts (refunds, etc.)
    df_filtered = df_filtered[df_filtered['Amount'] > 0]

    # Filter by date (only data from specified date onward)
    df_filtered['Transaction Date'] = pd.to_datetime(df_filtered['Transaction Date'])
    df_filtered = df_filtered[df_filtered['Transaction Date'] >= '2025-07-01']

    # Group by year-month and save
    df_filtered['YearMonth'] = df_filtered['Transaction Date'].dt.strftime('%Y%m')
    grouped = df_filtered.groupby('YearMonth')

    for year_month, group_df in grouped:
        output_path = f"data/activity_converted_{year_month}.csv"
        group_df.to_csv(output_path, index=False, encoding='shift_jis')
        print(f"Saved: {output_path}")
Importing into the Web Accounting App
The converted CSV files can be imported into the web accounting app in the following ways:
Method 1: Manually merge the data
- Copy the converted CSV to
web_accounting/data/csv/[year]/[yearmonth].csv - If existing data is present, open it in Excel and merge manually
Method 2: Enter individually through the app
- Refer to the converted CSV while entering data through the web app’s input screen
- This allows you to assign more granular categories while entering
I typically use Method 2. It’s convenient because I can review the AMEX statements and assign appropriate categories as I go.
Security Measures
Since this app handles personal financial data, I paid special attention to security.
Implemented Security Measures
| Measure | Implementation |
|---|---|
| HTTPS Communication | Mandatory HTTPS via SSL/TLS certificates |
| WebAuthn Authentication | FIDO2-compliant passkey authentication, no passwords |
| Session Management | Secure Cookie, HTTPOnly, SameSite attributes configured |
| IP BAN | 24-hour BAN after 5 failed login attempts |
| CSRF Protection | Protected via Flask sessions and SameSite attribute |
| File Upload Restrictions | Only image files allowed, 16MB size limit |
| Admin Authentication | Separate password authentication for admin screen |
| Data Encryption | Session keys managed via environment variables |
Security Configuration Code
Security settings in app.py:
# Session configuration
app.secret_key = os.environ.get('FLASK_SECRET_KEY', 'default_secret_key')
app.config['PERMANENT_SESSION_LIFETIME'] = timedelta(days=30)
app.config['SESSION_COOKIE_SECURE'] = True      # HTTPS required
app.config['SESSION_COOKIE_HTTPONLY'] = True    # Disable JS access
app.config['SESSION_COOKIE_SAMESITE'] = 'Lax'   # CSRF protection

# File upload restrictions
app.config['MAX_CONTENT_LENGTH'] = 16 * 1024 * 1024  # 16MB
ALLOWED_EXTENSIONS = {'png', 'jpg', 'jpeg', 'gif', 'webp'}

def allowed_file(filename):
    return '.' in filename and \
           filename.rsplit('.', 1)[1].lower() in ALLOWED_EXTENSIONS
For production environments, set FLASK_SECRET_KEY as an environment variable with an unpredictable random string.
Admin Password Configuration
The admin password for accessing the management screen is stored as a SHA256 hash:
# Default password hash
DEFAULT_PASSWORD_HASH = "7c4b006def035d37fd5d9f8a67a2fb73626ae2c3a502573bc026d80aebda1930"

def hash_password(password):
    # Hash password with SHA256
    return hashlib.sha256(password.encode('utf-8')).hexdigest()
For production, set your own hash value via the ADMIN_PASSWORD_HASH environment variable.
Hands-On Impressions
Here are my thoughts after using this app in production for several months.
What Worked Well
- Quick input from the phone: Being able to enter expenses on the spot while out is very convenient
- Comfortable passkey authentication: Fingerprint login means no password entry needed
- High customizability: Freedom to add categories and features as needed
- Data ownership: Everything stored on my NAS, fully under my control
- AMEX integration: Efficient import of credit card statements
- Beautiful Apple-style UI: A nice-looking interface keeps motivation high
Areas for Improvement
- Enhanced CSV import: It would be nice to upload CSVs directly from the web interface
- Graph functionality: Visualizing spending trends by category with charts
- Budget management: Setting monthly budgets with overspending alerts
- Multi-user sharing: A system for sharing expense data with family members
- Automatic backups: A mechanism for regular data backups
There’s still plenty of room for improvement. I plan to add these features in future updates.
Performance
I’m running this as a Docker container on a Synology NAS (DS723+), and the response time is excellent. Flask is lightweight, so it runs comfortably even on modest hardware like a NAS.
Even as data volume grows, the performance hasn’t degraded since CSV files are split by year and month.
Conclusion
In this article, I shared how I built a Flask-based, mobile-first web accounting application.
With WebAuthn (passkey) authentication, an Apple-inspired UI, and AMEX data import, I believe this has become a practical and feature-rich app.
If you want to manage your own data and need a highly customizable household budget app, I’d recommend this approach. While I don’t plan to publish the full code on GitHub, I hope this article serves as a useful reference.
Future Plans
Here are the features I plan to add going forward:
- CSV import via web interface
- Chart visualization with Chart.js
- Budget management and alert features
- Monthly report PDF export
- Multi-user support (family accounts)
- Automatic entry of recurring expenses
- Automatic data backups
If you have ideas for features you’d like to see, feel free to leave a comment!
I hope this article has been helpful for anyone thinking about building their own web accounting app.



Leave a Reply